
기존의 레이아웃이나 위젯이 프로젝트에서 사용되기에 기능이 부족할 때, View의 subclass를 만들어서 커스텀뷰를 생성할 수 있다. 만약 레이아웃이나 위젯이 기존의 것과 크게 상이하지 않으면, 기반이 되는 레이아웃이나 위젯을 상속받아 기능을 재정의하면 된다.
커스텀뷰를 위한 기본적인 접근은 다음과 같다.
- 기존의 뷰 클래스나 위젯이나 레이아웃 클래스를 상속받는다.
- 메서드들을 오버라이드 한다. 오버라이드 할 메서드는 주로 on이 붙은 메서드이다. 예를 들면, onDraw(), onMeasure(), onKeyDown() 같은 것들이다.
- 새로운 확장 클래스를 사용한다.
완전히 커스터마이즈된 컴포넌트
- 가장 일반적으로 상속할 수 있는 뷰는 View이다. 그래서 일단 View 클래스를 상속받는다.
- XML로부터 attribute와 parameter를 받아올 수 있는 생성자를 공급한다. 사용자가 원하는 고유의 attribute와 parameter를 설정할 수 있다.
- Event Listener, Property accessor and modifier를 생성한다. 이외 가능한 컴포넌트 클래스 고유의 기능을 설정한다.
- onMeasure(), onDraw()를 오버라이드한다. 기본적으로 onDraw()는 아무것도 하지 않고, onMeasure()는 100x100 사이즈만 세팅한다.
- 필요한 다른 on으로 시작하는 메서드를 오버라이드한다.
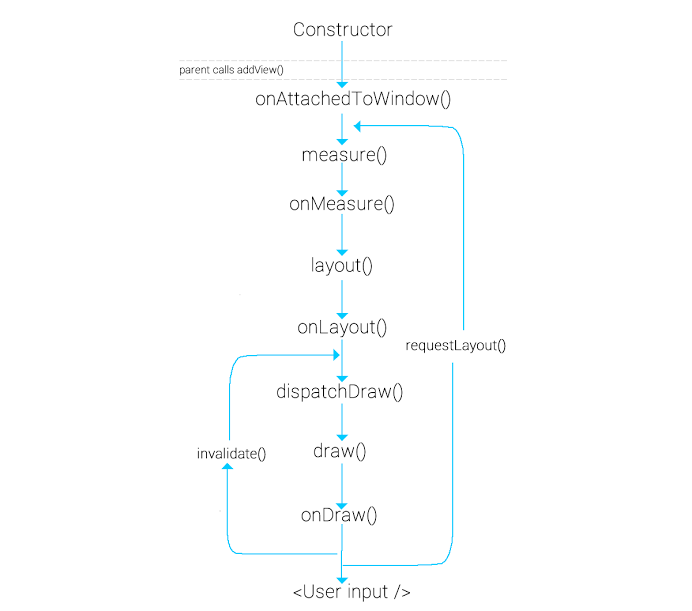
Constructor
모든 뷰는 생성자에서 출발한다. 생성자에 초기화를 하고, default 값을 설정한다. 뷰는 초기설정을 쉽게하기 위해 AttributeSet이라는 인터페이스를 지원한다. 먼저 attrs.xml 파일을 만들고 이 파일의 내용을 호출함으로써 뷰의 설정을 쉽게 할 수 있다.
attrs.xml 경로는 /res/values/attrs.xml
    <declare-styleable name="RoundedCornerTextView" >
    	  <attr name="radius" format="dimension" />
    	  <attr name="borderWidth" format="dimension" />
    	  <attr name="borderColor" format="color" />
    </declare-styleable>
이와 같이 생성자를 선언하고 초기화해준다.
      public RoundedCornerTextView(Context context) {
        super(context);
        init(context, null, 0);
      }

      public RoundedCornerTextView(Context context, AttributeSet attrs) {
        super(context, attrs);
        init(context, attrs, 0);
      }

      public RoundedCornerTextView(Context context, AttributeSet attrs, int defStyle) {
        super(context, attrs, defStyle);
        init(context, attrs, defStyle);
      }

        private void init(Context context, AttributeSet attributeSet, int defStyle) {
        float density = context.getResources().getDisplayMetrics().density;

        // TypedArray로 attrs.xml에 선언된 값을 가져오고 초기화할 수 있다.
        TypedArray typedArray = context.obtainStyledAttributes(attributeSet, R.styleable.RoundedCornerTextView, defStyle, 0);
        try {
          // getDimension에서 읽어온 값은 자동으로 DP로 환산되어 적용된다.
          mBorderColor = typedArray.getColor(R.styleable.RoundedCornerTextView_borderColor, 0xFFFF0000);
          mBorderWidth = typedArray.getDimension(R.styleable.RoundedCornerTextView_borderWidth, density * 2);
          mCornerRadius = typedArray.getDimension(R.styleable.RoundedCornerTextView_radius, 16.0f);
        } finally {
          // TypedArray 사용 후 반드시 recycle();
          typedArray.recycle();
        }

        mPaint = new Paint();
        mPaint.setStyle(Paint.Style.STROKE);
        mPaint.setColor(mBorderColor);
        mPaint.setStrokeWidth(mBorderWidth);
        mRectF = new RectF();
      }
onAttachedToWindow()
부모 뷰가 addView(childView)를 호출하고 나서 자식 뷰가 Window에 attach되는데, 이때부터 뷰의 id 를 통해 접근할 수 있다.
onMeasure()
onMeasure() 메서는 조금 더 복잡하다.
- 오버라이드된 onMeasure() 메서드는 width, height 제약을 위한 요구사항으로써 처리되는 width, height Spec과 함께 호출된다. (widthMeasureSpec and heightMeasureSpec 파라미터) 자세한 내용은 View.onMeasure(int, int)에서 참고. MeasureSpec은 전의 내용대로.
- UNSPECIFIED - 부모 View는 자식 View가 원하는 치수대로 결정한다.
- EXACTLY - 부모 View가 자식 View에게 정확한 크기를 강요한다. (match_parent)
- AT MOST - 부모 View가 자식 View에게 최대 크기를 강요한다. (wrap_content)
뷰의 width와 height는 둘 중 하나이다.
- 고정 (EXACTLY) - MeasureSpec.getSize() 함수로 얻은 값을 설정한다.
- 가변 (AT_MOST) - 내용물의 크기를 계산한 값을 넘겨준다. ex) getDip(10), width = 2 * (int)mPaint.measureText(mMessage) + padding1 + paddind2
- 컴포넌트의 onMeasure() 메서드는 컴포넌트를 렌더링하는데 필요한 측정 width와 height를 계산해야한다.
- width와 height가 계산되면, setMeasuredDimension(int width, int height) 메서드에 계산된 값을 전달하면서 호출한다. 이것에 실패하면 exception이 발생한다.
여기서 정확하게 View를 위치시키기 위해서는 View의 기하적 구조를 좀 알아야할 필요가 있다. Burt.K 님이 잘 정리해놓은 글이 있어서 인용한다.
뷰의 기하(Geometry)
- 뷰의 기하는 사각형이다.
- [(left, top), (right, bottom)] or [(left, top), (width, height)] 로 사각형을 정의한다.
- 안드로이드에서 뷰는 두 종류의 width와 height를 가지고 있다.
- Measured Width, Measured Height 는 뷰가 부모뷰 크기의 범위 내에서 가지고 싶어하는 너비와 높이이다.
- Drawing Width, Drawing Height 는 뷰의 실제 너비와 높이로 뷰를 그리기 위해서 사용한다.
- 안드로이드에서는 이 Drawing Width와 Drawing Height를 width와 height로 표기한다.
- onMeasure -> sets up measuredWidth/measuredHeight
- onLayout -> sets up the width/height of the widget.
- 따라서 Measured Width, Measured Height 는 Drawing Width, Drawing Height 와 다를 수 있다.
- 왜냐하면 뷰의 패딩, 마진 등을 고려하면 원하는 크기에서 패딩 및 마진 값을 빼야 하기 때문이다.
- 뷰의 정확한 위치와 크기는 언제 알 수 있는가?
- 안드로이드에서 뷰의 위치와 크기는 Layout 과정이 끝나야 정확히 계산된다.
- 이 Layout 과정은 여러번 호출 될 수 있다.
- 그렇기 때문에 Draw 과정이 시작되기 직전에 View의 정확한 위치와 크기를 알 수 있다.
- 위치 얻기 : getLeft(), getTop()
- 크기 얻기 : getWidth(), getHeight()
- 그렇다면 View의 Draw 과정이 시작되기 직전을 어떻게 알 수 있을까?
- ViewTreeObserver 사용
- 뷰의 크기를 알고자 하는 뷰에서 getViewTreeObserver() 를 통해서 ViewTreeObserver를 가져온다
- OnPreDrawListener 를 등록해서 드로잉 직전에 리스너가 호출 되도록 한다.
- ViewTreeObserver 사용
출처 : https://blog.burt.pe.kr/안드로이드-커스텀뷰-이해하기/
onLayout()
protected void onLayout(boolean changed, int left, int top, int right, int bottom)
boolean은 사이즈가 변경됐는가? 옮겨졌는가? 에 따라 결정
int 4개는 부모의 상대적인 포지션
뷰의 크기와 위치를 할당한다.
onDraw()
onDraw() 메서드는 어떤것이든 구현할 수 있는 Canvas를 전달한다. 구현가능한 것으로는 2D 그래픽, 다른 스탠다드 또는 커스텀 컴포넌트, styled text, 또는 생각하는 어떤 것이 있다.
3D 그래픽은 지원하지 않는다. 3D 그래픽을 위해서는 SurfaceView를 상속받아 다른 쓰레드에서 그리기를 해야한다.
Canvas 클래스에는 그림을 그리기 위한 많은 함수들이 제공된다. 선, 사각형, 원, path, 글자, 비트맵 등을 그리는 함수가 제공된다. 그리고 그림을 그리는 함수에는 Paint 인자를 넘겨주는데 그림을 그리기 위한 면색, 선색, 그리기 스타일 (fill, stroke, fill & stroke) 등과 같은 속성들을 설정해서 넘겨 주게 된다.
ViewGroup의 경우에는 onDraw()가 아닌 dispatchDraw()에서 작업을 해줘야한다.
주의할 점은 onDraw함수를 호출시 많은 시간이 소요된다. Scroll 또는 Swipe 등을 할 경우 뷰는 다시 onDraw와 onLayout을 다시 호출하게 된다. 따라서 함수 내에서 객체할당을 피하고 한 번 할당한 객체를 재사용할 것이 권장된다.
      @Override
      protected void onDraw(Canvas canvas) {
        mRectF.left = mBorderWidth;
        mRectF.top = mBorderWidth;
        mRectF.right = getWidth() - mBorderWidth;
        mRectF.bottom = getHeight() - mBorderWidth;
        canvas.drawRoundRect(mRectF, mCornerRadius, mCornerRadius, mPaint);
        super.onDraw(canvas);
      }
View Update
invalidate()와 requestLayout() 함수는 런타임에 뷰를 다시 그릴 수 있게 한다.
invalidate()
단순히 뷰를 다시 그릴 때 사용한다. 예를 들어 뷰의 stroke 또는 color가 변경되거나 touch event가 발생할 때 onDraw() 함수를 재호출하면서 뷰를 업데이트한다.
requestLayout()
onMeasure()부터 다시 뷰를 그린다. 뷰의 사이즈가 변경될 때 재측정이 필요하기 때문에 그렇다.
GestureDetector
tapping, pulling, pushing, flinging, zooming 같은 현대적인 터치 UI 인터랙션을 제공하기 위해 제공되는 클래스이다.
    class MyListener extends GestureDetector.SimpleOnGestureListener {
       @Override
       public boolean onDown(MotionEvent e) {
           return true;
       }
    }
    detector = new GestureDetector(PieChart.this.getContext(), new MyListener());

    // ...

    @Override
    public boolean onTouchEvent(MotionEvent event) {
       boolean result = detector.onTouchEvent(event);
       if (!result) {
           if (event.getAction() == MotionEvent.ACTION_UP) {
               stopScrolling();
               result = true;
           }
       }
       return result;
    }
Animation
커스텀뷰에서의 애니메이션은 frame 단위의 프로세스이다. 예를 들어 원의 크기가 점점 커지는 애니메이션을 구현할 때, 각 단계마다 invalidate()를 호출하여 뷰를 그리게 된다. 커스텀뷰에서 가장 많이 사용되는 애니메이션은 ValueAnimator이다. Interpolator를 포함하여 어떠한 값이든 애니메이션이 가능하게 도와준다.
    ValueAnimator animator = ValueAnimator.ofInt(0, 100);
    animator.setDuration(1000);
    animator.setInterpolator(new DecelerateInterpolator());
    animator.addUpdateListener(new ValueAnimator.AnimatorUpdateListener() {
      public void onAnimationUpdate(ValueAnimator animation) {
        int newRadius = (int) animation.getAnimatedValue();
      }
    });
    animator.start();
성능
- onDraw()에서 객체 생성 및 할당을 줄이고 작업도 최소한으로 만들어야한다.
- invalidate(), requestLayout() 호출은 최대한 자제한다.
- ViewGroup의 계층구조를 최대한 얉게 만든다.
- 복잡한 UI를 가진다면, 커스텀 ViewGroup을 작성하는 것을 고려한다. 자식뷰의 사이즈와 모양에 대한 해당 앱에 특화된 가정을 세울 수 있기 때문에 자식뷰를 measure 하는데 소모되는 로드를 줄일 수 있다.
Compound Controls
재사용가능한 컴포넌트들의 그룹으로 새로운 컴포넌트를 만드는 방법이다.
- Layout을 상속받는 클래스를 만든다. 이에 XML을 사용할 수도 있고, 직접 프로그래밍하여 컴포넌트를 추가할 수도 있다.
- XML로부터 attribute와 parameter를 받아올 수 있는 생성자를 공급한다. 사용자가 원하는 고유의 attribute와 parameter를 설정할 수 있다. 그 다음 다른 뷰들을 안에 추가한다.
- 내부의 컴포넌트들이 사용할 수 있는 Event Listener, Property accessor and modifier를 생성한다.
- onDraw()와 onMeasure()는 호출하지 않아도 된다. layout은 기본적으로 잘 동작하도록 되어있기 때문이다. 필요하면 오버라이드하도록 한다.
- 필요한 다른 on으로 시작하는 메서드를 오버라이드한다.
Modifying an Existing View Type
이미 존재하는 View Type은 해당 View Type의 클래스를 상속받아서 완전히 커스터마이즈된 컴포넌트를 만들듯이 작업하면 된다.
레퍼런스
https://developer.android.com/guide/topics/ui/custom-components
https://tjandroid.blogspot.com/2012/12/custom-view.html
https://blog.burt.pe.kr/안드로이드-커스텀뷰-이해하기/
https://hyeonu1258.github.io/2018/03/26/안드로이드 면접/
https://chrisjhyoon.wordpress.com/2015/07/01/getdimension-과-getdimensionpixelsize-의-차이점/