[RabbitMQ] 3장. Pub/sub 기능 활용
RabbitMQ 매뉴얼
목차
- RabbitMQ 소개
- Work Queue 활용
- Pub/sub 기능 활용
- Routing 활용
- Topic 활용
작성일 : 2018.09.11
3. Pub/sub 기능 활용
Pub/sub을 쓰는 이유
RabbitMQ의 핵심 아이디어는,producer는 어떤 메시지도 큐로 직접 보내지 않는다는 것이다.producer는 내가 만든 메시지가 어떤 대기 큐로 전달될지 전혀 알지 못하는 경우가 많다.- 이제 큐 말고
exchange에게 메시지를 보내보자!
Pub/sub 이해하기
-
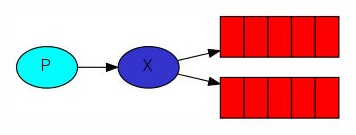
exchange :
producer로부터 메시지를 받아서 큐들에게 푸시한다.이 때, 어떤 큐에게 푸시할 것인지는
exchange type에 의해 정해진다.-
fanout:exchange가 알고 있는 모든 큐 들에게 모든 메시지를 전송한다. -
exchange사용법ch.sendToQueue()를 쓰지 않고,ch.publish(exchange 이름, 큐 이름)사용!
-
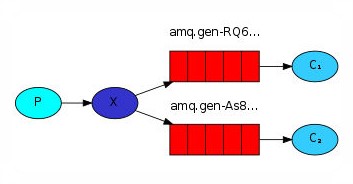
Temporary Queues
-
큐의 이름을 지정해 주는 것은 중요할 수도 있지만, 아닐 수도 있다. (모든 큐를 대상으로 할 경우…)
-
이럴 때…
RabbitMQ에 연결할 때마다 새 거 이면서 비어 있는 큐가 필요하다.consumer가 연결을 종료하면 즉시 해당 큐를 지운다.
ch.assertQueue(큐 이름, { exclusive: true }); 이렇게 큐를 생성하면 된다.
이렇게 하면 랜덤으로 큐의 이름도 만들어주고,
커넥션이 끊기면 큐도 자동으로 삭제해준다.
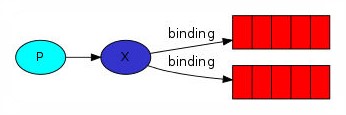
Bindings
-
fanout exchange와 큐를 만들었으므로,exchange에게 큐로 메시지를 보내게끔 시켜야 한다. -
binding :
exchange와 큐의 관계를 의미한다.ch.bindQueue(큐이름, ex이름, "");이렇게 연결해주면 된다.
정리하면?
-
producer는 큐가 아니라exchange에 연결되며,fanout옵션을 줘서 따로 라우팅 되지 않게끔 한다. -
커넥션을 먼저 연결한 뒤에
exchange를 생성함으로써, 존재하지 않는exchange에 메시지를 보내는 것을 방지해야 한다.
emit_logs.js
#!/usr/bin/env node

var amqp = require('amqplib/callback_api');

amqp.connect('amqp://localhost', function(err, conn) {
  conn.createChannel(function(err, ch) {
    var ex = 'logs';
      // 채널에 연결된 후, exchange를 생성한다.
    var msg = process.argv.slice(2).join(' ') || 'Hello World!';

    ch.assertExchange(ex, 'fanout', {durable: false});
      // exchange의 타입을 fanout으로 지정한 뒤 연결한다.

    ch.publish(ex, '', new Buffer(msg));
      // 인자 : 전송할 ex이름, 메시지를 보낼 큐 지정, 메시지 내용
      // 큐를 딱히 지정하지 않았으므로 모든 큐에게 보낸다.

    console.log(" [x] Sent %s", msg);
  });

  setTimeout(function() { conn.close(); process.exit(0) }, 500);
});
receive_logs.js
#!/usr/bin/env node

var amqp = require('amqplib/callback_api');

amqp.connect('amqp://localhost', function(err, conn) {
  conn.createChannel(function(err, ch) {
    var ex = 'logs';

    ch.assertExchange(ex, 'fanout', {durable: false});
      // exchange를 fanout 타입으로 생성해 연결한다.

    ch.assertQueue('', {exclusive: true}, function(err, q) {
      // exclusive를 true로 설정해서 temporary queue를 사용하도록 한다.
      // 여기서는 q가 임시로 만든 큐를 리턴해준다.

      console.log(" [*] Waiting for messages in %s. To exit press CTRL+C", q.queue);

      ch.bindQueue(q.queue, ex, '');
        // 리턴 받은 큐와 채널에서 생성한 exchange를 bind 해준다.
        // 인자 : 큐 이름, ex 이름, 라우팅
        // 세번째 인자가 없으므로 해당 큐는 ex에서 오는 모든 메시지를 받는다.

      ch.consume(q.queue, function(msg) {
        console.log(" [x] %s", msg.content.toString());
      }, {noAck: true});
    });
  });
});
참고 문헌
RabbitMQ 공식 홈페이지의 튜토리얼을 번역하며 공부한 내용입니다.