목표.
- 각 연산자의 분류를 이해하고 분류된 연산자의 함수들의 활용에 집중하자.
- 활용에 집중하여 함수형 프로그래밍의 기초체력을 다지자.
생성연산자
- Just(), fromXXX, create(), interval(), range(), timer(), intervalRange(), defer(), repeat() 변환연산자
- map(), flapMap(), concatMap(), switchMap(), groupBy(), scan(), buffer(), window(). 필터 연산자
- filter(), take(), skip(), distinct() 결합 연산자
- zip(), combineLatest(), merge(), concat() 조건 연산자
- amb(), takeUntil(), SkipUntil(), all() 에러 처리 연산자
- onErrorReturn(), onErrorResumeNext(), retry(), retryUntil 기타 연산자
- subscribe(), subscribeOn(), observeOn(), reduce(), count().
1.생성연산자
interval()
일정 시간 간격으로 데이터 흐름 생성.
 @CheckReturnValue
    @SchedulerSupport(SchedulerSupport.COMPUTATION)
    public static Observable<Long> interval(long initialDelay, long period, TimeUnit unit) {
        return interval(initialDelay, period, unit, Schedulers.computation());
    }

@CheckReturnValue
    @SchedulerSupport(SchedulerSupport.CUSTOM)
    public static Observable<Long> interval(long initialDelay, long period, TimeUnit unit, Scheduler scheduler) {
        ObjectHelper.requireNonNull(unit, "unit is null");
        ObjectHelper.requireNonNull(scheduler, "scheduler is null");
주의!. 스케쥴러가 계산 스켸쥴러이다. 현재 스레드가 아니라 계산을 위한 별도의 스레드에서 동작한다. 기본적으로 영원히 지속되는 때문에 폴링 용도로 활용됨.
public void printNumbers() {
		CommonUtils.exampleStart();
		Observable<Long> source = Observable.interval(100L, TimeUnit.MILLISECONDS)
				.map(data -> (data + 1) * 100)
				.take(5);
		source.subscribe(Log::it);
		CommonUtils.sleep(1000);
		CommonUtils.exampleComplete();
	}
timer()
timer함수는 interval함수와 유사하지만 한 번만 실행하는 함수입니다.
일정 시간이 지난 후에 한 개의 데이터를 발행하고 onComplete()이벤트를 발생합니다.
@CheckReturnValue
    @SchedulerSupport(SchedulerSupport.COMPUTATION)
    public static Observable<Long> timer(long delay, TimeUnit unit) {
        return timer(delay, unit, Schedulers.computation());
    }

public void showTime() {
		CommonUtils.exampleStart();
		Observable<String> source = Observable.timer(500L, TimeUnit.MILLISECONDS)
				.map(notUsed -> {
					return new SimpleDateFormat("yyyy/MM/dd HH:mm:ss")
							.format(new Date());
				});
		source.subscribe(Log::it);
		CommonUtils.sleep(1000);
		CommonUtils.exampleComplete();
	}
range()
주어진 값(n)부터 m개의 Integer객체를 발행합니다. 앞서 interval()와 timer()함수는 Long()객체를 발행했지만 range() 함수는 Integer객체를 발행하는 것이 다르다. for루프 대신 활용.
public void forLoop() {
		Observable<Integer> source = Observable.range(1, 10)
			.filter(number -> number % 2 == 0);
		source.subscribe(Log::i);
	}

@CheckReturnValue
  @SchedulerSupport(SchedulerSupport.NONE)
  public static Observable<Integer> range(final int start, final int count) {
      if (count < 0) {
          throw new IllegalArgumentException("count >= 0 required but it was " + count);
      }
      if (count == 0) {
          return empty();
      }
      if (count == 1) {
          return just(start);
      }
      if ((long)start + (count - 1) > Integer.MAX_VALUE) {
          throw new IllegalArgumentException("Integer overflow");
      }
      return RxJavaPlugins.onAssembly(new ObservableRange(start, count));
  }
현재 스레드에서 실행되기 때문에 sleep메서드 호출안됨.
intervalRange()
interval()과 range()를 혼합해 놓은 함수. interval() 함수처럼 일정한 시간 간격으로 값을 출력하지만 range()함수처럼 시작 숫자(n)로부터 m개만큼의 값만 생성하고 onComplete 이벤트가 발생. 즉 interval()함수처럼 무한히 데이터 흐름을 발생하지 않는다.
Observable<Long> source = Observable.intervalRange(1,  //start
				5,              //count
				100L ,          //initialDelay
				100L,           // period
				TimeUnit.MILLISECONDS); //unit
		source.subscribe(Log::i);
		CommonUtils.sleep(1000);
		CommonUtils.exampleComplete();

@CheckReturnValue
    @SchedulerSupport(SchedulerSupport.COMPUTATION)
    public static Observable<Long> intervalRange(long start, long count, long initialDelay, long period, TimeUnit unit) {
        return intervalRange(start, count, initialDelay, period, unit, Schedulers.computation());
    }
take를 활용해서 intervalRange를 만들었다.
defer()
defer 는 timer 함수와 비슷하지만 데이터 흐름 생성을 구독자가 subscribe 함수를 호출할 때까지 미룰 수 있다. 이때 새로운 Observable이 생성된다.
public void marbleDiagram() {
		Callable<Observable<String>> supplier = () -> getObservable();
		Observable<String> source = Observable.defer(supplier);

		source.subscribe(val -> Log.i("Subscriber #1:" + val));
		source.subscribe(val -> Log.i("Subscriber #2:" + val));
//		source.subscribe(val -> Log.i("Subscriber #3r:" + val));
//		source.subscribe(val -> Log.i("Subscriber #4r:" + val));
		CommonUtils.exampleComplete();
	}

	//번호가 적인 도형을 발행하는 Observable을 생성합니다.
	private Observable<String> getObservable() {
		if (colors.hasNext()) {
			String color = colors.next();
			return Observable.just(
				Shape.getString(color, Shape.BALL),
				Shape.getString(color, Shape.RECTANGLE),
				Shape.getString(color, Shape.PENTAGON));
		}

		return Observable.empty();
	}

	public void notDeferred() {
		Observable<String> source = getObservable();

		source.subscribe(val -> Log.i("Subscriber #1:" + val));
		source.subscribe(val -> Log.i("Subscriber #2:" + val));
		CommonUtils.exampleComplete();
	}

main | value = Subscriber #1:1
main | value = Subscriber #1:1-R
main | value = Subscriber #1:1-P
main | value = Subscriber #2:3
main | value = Subscriber #2:3-R
main | value = Subscriber #2:3-P
-----------------------
main | value = Subscriber #1:5
main | value = Subscriber #1:5-R
main | value = Subscriber #1:5-P
main | value = Subscriber #2:5
main | value = Subscriber #2:5-R
main | value = Subscriber #2:5-P
-----------------------
이해가 될듯 말듯하나 정확히 정의내리지 못하겠다. 확실한건 defer는 supplier의 한 단계가 끝나면 새로운 Observable을 만들어 다음 Observable에 supplier를 적용시킨다는 것이다. 없을 땐 하나의 숫자가 Observable 한개에서 논다.
repeat()
단순 반복 실행을 한다. 해당 함수는 서버와 통신을 하면 해당 서버가 잘 살아있는지 확인하는 코드로 주로 활용한다.
String[] balls = {RED, GREEN, BLUE};
		Observable<String> source = Observable.fromArray(balls)
				.repeat(3);

		source.doOnComplete(() -> Log.d("onComplete"))
		.subscribe(Log::i);
		CommonUtils.exampleComplete();
1,2,3,1,2,3,1,2,3 하고나서 complete 소환된다.
public void heartbeatV1() {
		CommonUtils.exampleStart();
		String serverUrl = "https://api.github.com/zen";

		Observable.timer(2, TimeUnit.SECONDS) 		//2초 간격으로 서버에 ping 날리기
			.map(val -> serverUrl)
			.map(OkHttpHelper::get)
			.repeat()
			.subscribe(res -> Log.it("Ping Result : " + res));
		CommonUtils.sleep(10000);
		CommonUtils.exampleComplete();
	}
sleep을 하면 현재 스레드가 아닌 다른 스레드에서 task가 완료되기를 기다리기 위해 호출한다. repeat, timer 대산 intervel로 할 수 있는데, 이때는 sleep으로 메인스레드의 sleep시간을 조절하여 interval을 제어한다.
2.변화 연산자
flatMap(), concatMap(), switchMap() 함수에 대해서 학습한다. 그리고 reduce() 함수와 유사한 scan() 함수, 그리고 조금은 색다른 groupBy() 함수도 알자.
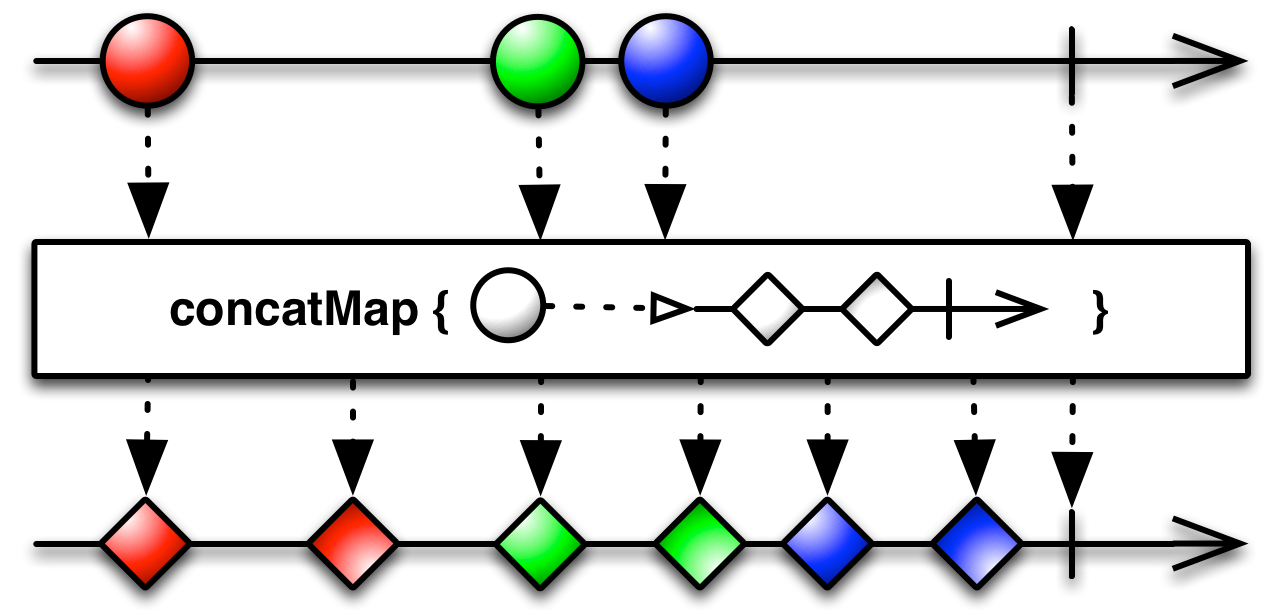
concatMap()함수
flatMap 함수와 유사하면서 조금 다룬. flatMap은 먼저 들어온 데이터를 처리하는 도중에 새로운 데이터가 들어오면 나중에 들어온 데이터의 처리 결과를 먼저 출력 이를 인터리빙
그러나 concatMap의 경우 먼저 들어온 데이터 순서대로 처리해서 결과를 낼 수 있도록 보장한다.
public void marbleDiagram() {
		CommonUtils.exampleStart(); //시간을 측정하기 위해 호출

		String[] balls = {RED, GREEN, BLUE}; //1, 3, 5
		Observable<String> source = Observable.interval(100L, TimeUnit.MILLISECONDS)
				.map(Long::intValue)
				.map(idx -> balls[idx])
				.take(balls.length)
				.concatMap(
					ball -> Observable.interval(200L, TimeUnit.MILLISECONDS)
									.map(notUsed -> ball + "<>")
									.take(2)); //2개의 다이아몬드
		source.subscribe(Log::it);
		CommonUtils.sleep(2000);
		CommonUtils.exampleComplete();
	}

  public void interleaving() {
		CommonUtils.exampleStart(); //시간을 측정하기 위해 호출

		String[] balls = {RED, GREEN, BLUE};
		Observable<String> source = Observable.interval(100L, TimeUnit.MILLISECONDS)
				.map(Long::intValue)
				.map(idx -> balls[idx])
				.take(3)
				.flatMap(
					ball -> Observable.interval(200L, TimeUnit.MILLISECONDS)
									.map(notUsed -> ball + "<>")
									.take(2));
		source.subscribe(Log::it);
		CommonUtils.sleep(2000);
		CommonUtils.exampleComplete();
	}

  RxComputationThreadPool-2 | 669 | value = 1<>
  RxComputationThreadPool-2 | 864 | value = 1<>
  RxComputationThreadPool-3 | 1068 | value = 3<>
  RxComputationThreadPool-3 | 1266 | value = 3<>
  RxComputationThreadPool-4 | 1466 | value = 5<>
  RxComputationThreadPool-4 | 1669 | value = 5<>

// 거의 1000ms
  -----------------------
  RxComputationThreadPool-2 | 374 | value = 1<>
  RxComputationThreadPool-3 | 476 | value = 3<>
  RxComputationThreadPool-2 | 575 | value = 1<>
  RxComputationThreadPool-2 | 575 | value = 5<>
  RxComputationThreadPool-3 | 675 | value = 3<>
  RxComputationThreadPool-4 | 779 | value = 5<>

// 거의 400ms
인터리빙의 차이가 크다. Observable.interval을 통해 100L 간격으로 발행하다가 flatMap을 만나 새로운 Observable에 다이아몬드가 2개씩 발행하는거로 변경되어 200ms 간격으로 발생.
concatMap을 활용하면 순서를 보장하지만 그만큼 시간이 더 오래 걸림.
switchMap()함수
concatMap함수와는 또다르다. concatMap함수가 인터리빙이 발생할 수 있는 상황에서 동작의 순서를 보장해준다면 switchMap함수는 순서를 보장하기 위해 기존에 진행 중이던 작업을 바로 중단합니다. 그리고 여러 개의 값을 발행되었을때 마지막에 들어온 값만 처리하고 싶을 때 사용합니다.
해당 함수는 마블다이어그램을 확인하는게 좋을 듯!
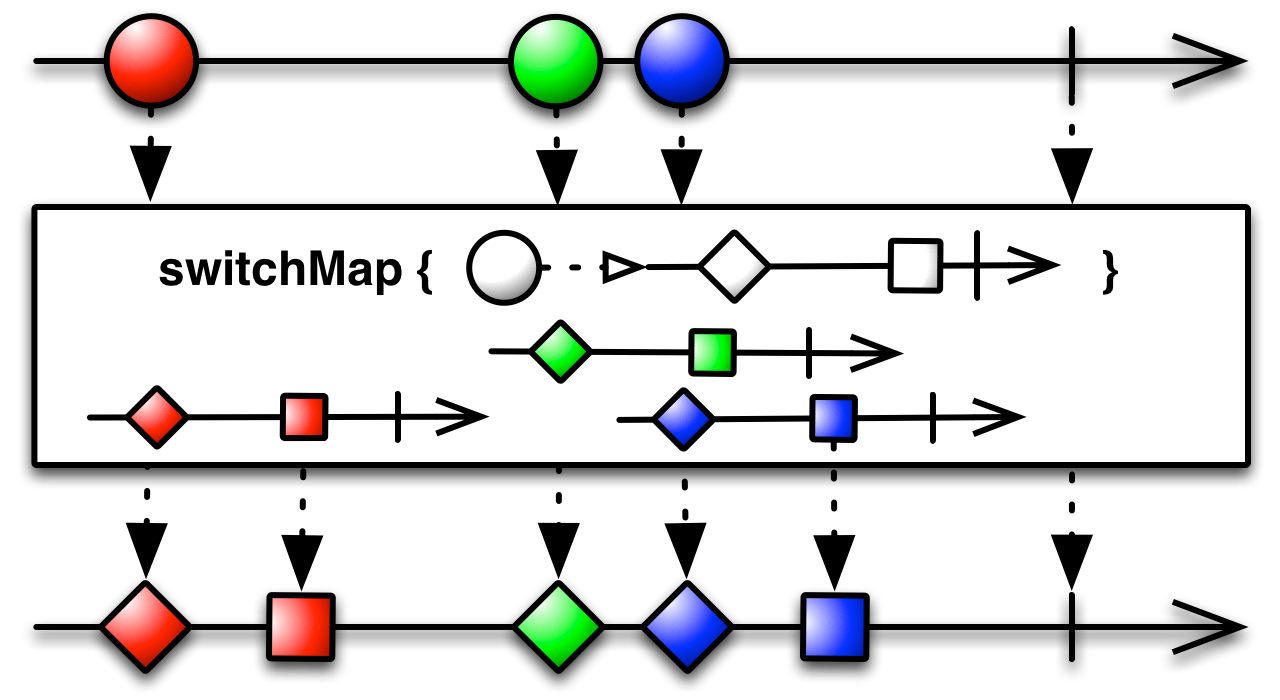
초록색 정삼각형과 파란색 마름모가 중복될 때, 마지막에 들어온 파란색 마름모로 발행된다.
public void marbleDiagram() {
		CommonUtils.exampleStart(); //시간을 측정하기 위해 호출

		String[] balls = {RED, GREEN, BLUE};
		Observable<String> source = Observable.interval(100L, TimeUnit.MILLISECONDS)
				.map(Long::intValue)
				.map(idx -> balls[idx])
				.take(balls.length)
				.switchMap(
					ball -> Observable.interval(200L, TimeUnit.MILLISECONDS)
									.map(notUsed -> ball + "<>")
									.take(2));
		source.subscribe(Log::it);
		CommonUtils.sleep(2000);
		CommonUtils.exampleComplete();
	}
public void usingDoOnNext() {
		CommonUtils.exampleStart(); //시간을 측정하기 위해 호출

		String[] balls = {RED, GREEN, BLUE};
		Observable<String> source = Observable.interval(100L, TimeUnit.MILLISECONDS)
				.map(Long::intValue)
				.map(idx -> balls[idx])
				.take(balls.length)
				.doOnNext(Log::dt)  //중간결과 확인용
				.switchMap(
					ball -> Observable.interval(200L, TimeUnit.MILLISECONDS)
									.map(noValue -> ball + "<>")
									.take(2));
		source.subscribe(Log::it);
		CommonUtils.sleep(2000);
		CommonUtils.exampleComplete();
	}
일단 위의 결과는
RxComputationThreadPool-1 | 106 | debug = 1
RxComputationThreadPool-1 | 206 | debug = 3
RxComputationThreadPool-1 | 307 | debug = 5
RxComputationThreadPool-4 | 510 | value = 5<>
RxComputationThreadPool-4 | 712 | value = 5<>
와 같다.
일단 첫번째, 계산 스레드에서 RxComputationThreadPool-1은 발행하는 것으로만 사용.
두번째, 100L 간격으로 첫번째 스레드에서 발행되고 있는데,
RxComputationThreadPool-1 의 1에서 2개의 다이아몬드 1을 200L간격으로 발행하려 했으나, 300에 5가있어 취소 700에 5<> 무시
RxComputationThreadPool-1 의 3에서 2개의 다이아몬드가 3을 200L 간격으로 발행하려 했으나, 400ms에 다이아몬드 3이 발행되려고했으나 5라는 값이 있어 취소 600ms에도 5의 Observable이 있어서 취소
5가 마지막으로 발행되어 5<> 두 개가 최종적으로 남은 것을 발행.
groupBy()함수
어떤 기준(KeySelector인수)으로 단일 Observable을 여러 개로 이루어진 Observable그룹(GroupedObserable)을 만듭니다.
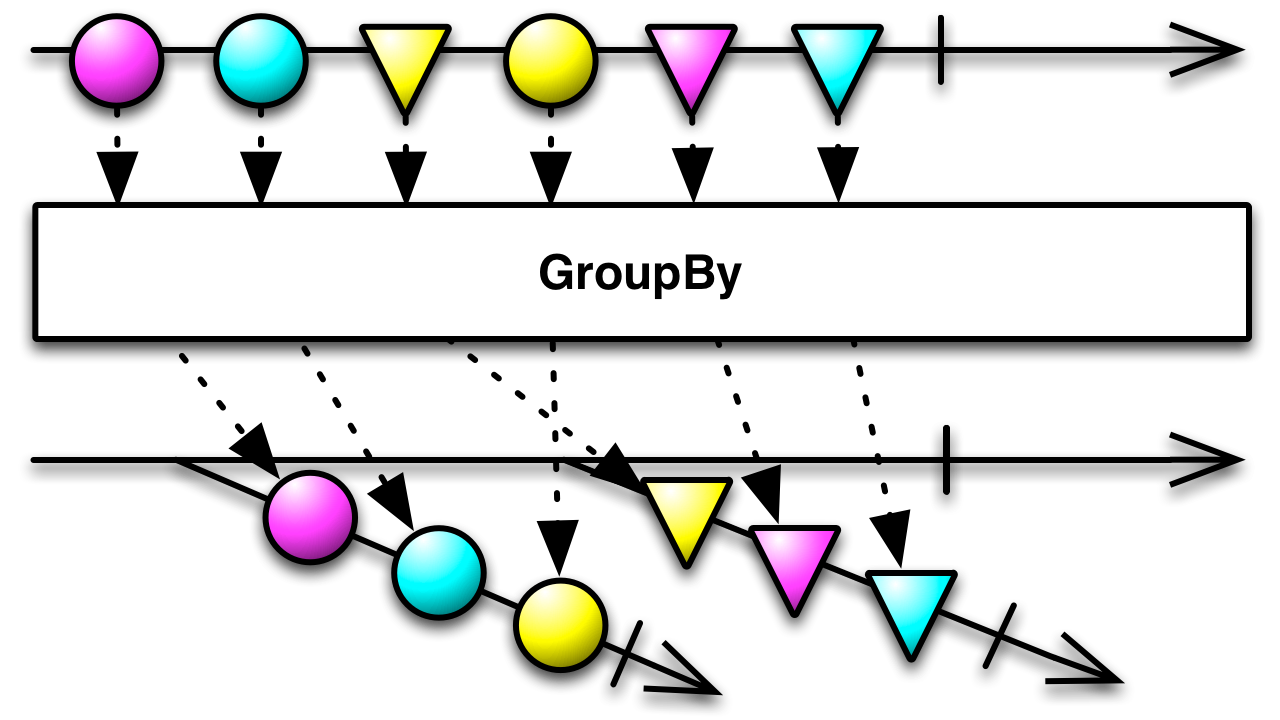
어떤 기준으로 Observable 각각을 여러 개 Observable의 그룹으로 구분한다고 생각하면 편하다.
@Override
	public void marbleDiagram() {
		String[] objs = {PUPPLE, SKY, triangle(YELLOW), YELLOW, triangle(PUPPLE), triangle(SKY)};
		Observable<GroupedObservable<String, String>> source =
				Observable.fromArray(objs)
				.groupBy(Shape::getShape);

		source.subscribe(obj -> {
			obj.subscribe(val ->
			System.out.println("GROUP:" + obj.getKey() + "\t Value:" + val));
		});
		CommonUtils.exampleComplete();
	}

GROUP:BALL	 Value:6
GROUP:BALL	 Value:4
GROUP:TRIANGLE	 Value:2-T
GROUP:BALL	 Value:2
GROUP:TRIANGLE	 Value:6-T
GROUP:TRIANGLE	 Value:4-T
public void filterBallGroup() {
		String[] objs = {PUPPLE, SKY, triangle(YELLOW), YELLOW, triangle(PUPPLE), triangle(SKY)};
		Observable<GroupedObservable<String, String>> source =
				Observable.fromArray(objs)
				.groupBy(Shape::getShape);

		source.subscribe(obj -> {
			obj.filter(val -> obj.getKey().equals(Shape.BALL))
			.subscribe(val ->
			System.out.println("GROUP:" + obj.getKey() + "\t Value:" + val));
		});
		CommonUtils.exampleComplete();
	}

GROUP:BALL	 Value:6
GROUP:BALL	 Value:4
GROUP:BALL	 Value:2
groupBy함수를 활용해 GroupedObservable을 형성한다. groupBy 안에는 Function 객체의 keySelector가 들어가면 위의 경우
public static String getShape(String obj) {
		if (obj == null || obj.equals("")) return NO_SHAPE;
		if (obj.endsWith("-H")) return HEXAGON;
		if (obj.endsWith("-O")) return OCTAGON;
		if (obj.endsWith("-R")) return RECTANGLE;
		if (obj.endsWith("-T")) return TRIANGLE;
		if (obj.endsWith("<>")) return DIAMOND;
		if (obj.endsWith("-P")) return PENTAGON;
		if (obj.endsWith("-S")) return STAR;
		return "BALL";
	}
다음과 같은 메소드가 분류자로 들어갔다. 다음 필터를 활용해 필요 내용만 출력한다.
scan()함수
reduce()의 경우 Observable에서 모든 데이터가 입력된 후 그것을 종합하여 마지막 1개의 데이터만을 구독자에게 발행하는 반면, scan() 함수는 실행 할 때 마다 입력값에 맞는 중간 결과 및 최종 결과를 구독자에게 발행합니다.
 public void marbleDiagram() {
		String[] balls = {RED, GREEN, BLUE}; //1,3,5
		Observable<String> source = Observable.fromArray(balls)
				.scan((ball1, ball2) -> ball2 + "(" + ball1 + ")");
		source.subscribe(Log::i);
		CommonUtils.exampleComplete();
	}

main | value = 1
main | value = 3(1)
main | value = 5(3(1))
3.결합 연산자
여러 개의 Observable을 조합하여 활용하는 결합 연산자를 알아보겠습니다. 결합 연산자는 다수의 Observable을 조합하여 활용하는 결합 연산자이며, 앞서 flatMap()함수나 groupBy() 함수 등은 1개의 Observable을 확장해 주는 반면 결합 연산자들은 여러 개 Observable을 내가 원하는 Observable로 결합해줍니다.
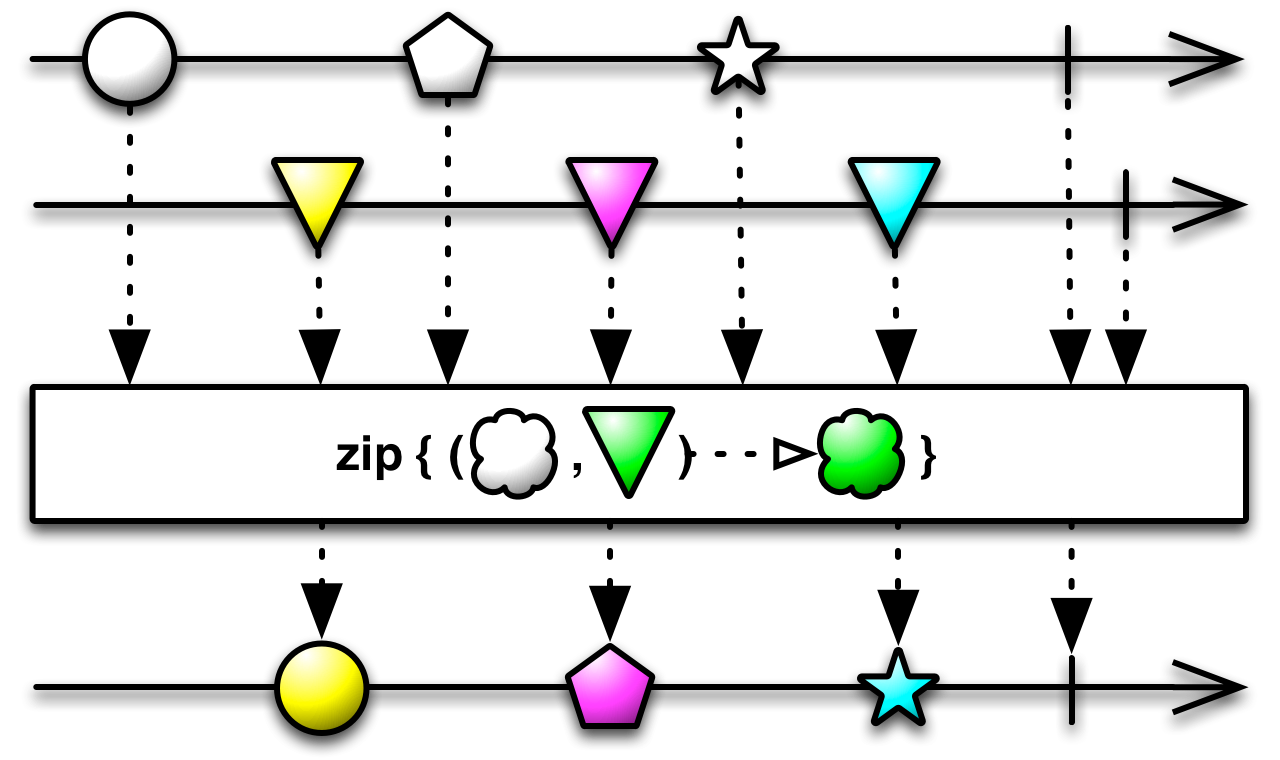
zip() 함수
결합 연산자에서 가장 먼저 알아야 할 함수는 zip() 각각의 Observable을 모두 활용해 2개 혹은 그 이상의 Observable을 결합하는데 있습니다. 예를 들어 A,B 두 개의 Observable을 결합한다면 2개의 Observable에서 모두 데이터를 발행해야 결합할 수 있습니다.
@SuppressWarnings("unchecked")
    @CheckReturnValue
    @SchedulerSupport(SchedulerSupport.NONE)
    public static <T1, T2, R> Observable<R> zip(
            ObservableSource<? extends T1> source1,
            ObservableSource<? extends T2> source2,
            BiFunction<? super T1, ? super T2, ? extends R> zipper) {
        ObjectHelper.requireNonNull(source1, "source1 is null");
        ObjectHelper.requireNonNull(source2, "source2 is null");
        return zipArray(Functions.toFunction(zipper), false, bufferSize(), source1, source2);
    }
첫 번째 Observable은 source1에 넣고 두 번째 Observable은 source2에 넣은 후 그것을 결합해줄 zipper 변수에 원하는 함수를 넣으면 된다는 뜻.
@Override
	public void marbleDiagram(){
		String[] shapes = {BALL, PENTAGON, STAR};
		String[] coloredTriangles = {triangle(YELLOW), triangle(PUPPLE), triangle(SKY)};

		Observable<String> source = Observable.zip(
			Observable.fromArray(shapes).map(Shape::getSuffix), // 모양을 가져옵니다.
			Observable.fromArray(coloredTriangles).map(Shape::getColor), // 색상을 가져옵니다.
			(suffix, color) -> color + suffix);
		source.subscribe(Log::i);
		CommonUtils.exampleComplete();
	}
2개의 ObservableSource 가 합쳐져서 return 되는 값이 zipArray로 나온다. 즉 합쳐져서 나온다는 말!
zip을 활용한 숫자 결합하는 함수를 만들어보기
public void zipNumbers() {
        Observable<Integer> source = Observable.zip(
                Observable.just(100, 200, 300),
                Observable.just(10, 20, 30),
                Observable.just(1, 2, 3),
                (x, y, z) -> x + y + z);

        source.subscribe(Log::i);
    }
interval()함수를 이용한 시간 결합
public void timeInterval(){
  Observable<String> source = Observable.zip(
    Observable.just("RED", "BLUE", "GREEN"),
    Observable.interval(300L, TimeUnit.MILLISECONDS),
    (value, i) -> value
  )
}
CommonUtils.sleep(1000);
위와 같이 시간 함수와 같이 사용할 수 있는데, 여기서 주의할점은 이놈이 있는걸 보아하니 계산 스레드에서 zip의 계산을 수행한다는 점을 주의깊게 생각해야한다.
전기 요금 계산 예제…. 코드가 생각해내기가 어려움.
package com.yudong80.reactivejava.chapter04.combine;

import static java.lang.Math.max;
import static java.lang.Math.min;

import java.text.DecimalFormat;

import org.apache.commons.lang3.tuple.Pair;

import com.yudong80.reactivejava.common.CommonUtils;
import com.yudong80.reactivejava.common.Log;

import io.reactivex.Observable;

public class ElectricBills {
	private int index = 0; //FIXME don't use it

	public void electricBillV1() {
		String[] data = {
			"100",  //910 + 93.3 * 100 = 10,240원
			"300",  //1600 + 93.3 * 200 + 187.9 * 100 = 39,050원
 			"800",  //7300 + 93.3 * 200 + 187.9 * 200 + 280.65 * 200 = 175,800원
		};

		Observable<Integer> basePrice = Observable.fromArray(data)
				.map(Integer::parseInt)
				.map(val -> {
					if (val <= 200) return 910;
					if (val <= 400) return 1600;
					return 7300;
				});

		Observable<Integer> usagePrice = Observable.fromArray(data)
				.map(Integer::parseInt)
				.map(val -> {
					double series1 = min(200, val) * 93.3;
					double series2 = min(200, max(val-200, 0)) * 187.9;
					double series3 = max(0, max(val-400, 0)) * 280.65;
					return (int)(series1 + series2 + series3);
				});

		Observable<Integer> source = Observable.zip(
				basePrice,
				usagePrice,
				(v1, v2) -> v1 + v2);

		//print the result
		source.map(val -> new DecimalFormat("#,###").format(val))
		.subscribe(val -> {
			StringBuilder sb = new StringBuilder();
			sb.append("Usage: " + data[index] + " kWh => ");
			sb.append("Price: " + val + "원");
			Log.i(sb.toString());

			index++; //FIXME side effect!!!!
		});
		CommonUtils.exampleComplete();
	}

	public void electricBillV2() {
		String[] data = {
			"100",  //910 + 93.3 * 100 = 10,240원
			"300",  //1600 + 93.3 * 200 + 187.9 * 100 = 39,050원
			"800",  //7300 + 93.3 * 200 + 187.9 * 200 + 280.65 * 200 = 175,800원
		};

		Observable<Integer> basePrice = Observable.fromArray(data)
				.map(Integer::parseInt)
				.map(val -> {
					if (val <= 200) return 910;
					if (val <= 400) return 1600;
					return 7300;
				});

		Observable<Integer> usagePrice = Observable.fromArray(data)
				.map(Integer::parseInt)
				.map(val -> {
					double series1 = min(200, val) * 93.3;
					double series2 = min(200, max(val-200, 0)) * 187.9;
					double series3 = max(0, max(val-400, 0)) * 280.65;
					return (int)(series1 + series2 + series3);
				});

		Observable<Pair<String, Integer>> source = Observable.zip(
				basePrice,
				usagePrice,
				Observable.fromArray(data),
				(v1, v2, i) -> Pair.of(i, v1+v2));

		//print the result
		source.map(val -> Pair.of(val.getLeft(),
					new DecimalFormat("#,###").format(val.getValue())))
		.subscribe(val -> {
			StringBuilder sb = new StringBuilder();
			sb.append("Usage: " + val.getLeft() + " kWh => ");
			sb.append("Price: " + val.getRight() + "원");
			Log.i(sb.toString());
		});
		CommonUtils.exampleComplete();
	}


	public static void main(String[] args) {
		ElectricBills demo = new ElectricBills();
		demo.electricBillV1();
		demo.electricBillV2();
	}
}
일단 무슨말인지는 알겠는데, 생각해내는게 문제일듯…
combineLatest() 함수
2개 이상의 Observable을 기반으로 Observable 각각의 값이 변경되었을 때 갱신해주는 함수.
마지막 인자로 combiner가 들어가는데 그것이 각 Observable을 결합하여 어떤 결과를 만들어주는 역할.
zip() 함수의 zipper 인자와 동일

첫번째 Observable에서만 데이터를 발행하거나 두 번쨰 Observable의 데이터 흐름만 있으면 구독자에게 어떤 데이터도 발행하지 않습니다. 하지만 두 Observable모두 값을 발행하면 그때는 결괏값이 나옵니다. 그 다음부터는 둘 중에 어떤 것이 갱신되던지 최신 결괏값을 보여줍니다. (이 붑ㄴ이 zip()함수와 다른 점입니다.)
    @SchedulerSupport(SchedulerSupport.NONE)
    public static <T1, T2, R> Observable<R> combineLatest(
            ObservableSource<? extends T1> source1,
            ObservableSource<? extends T2> source2,
            BiFunction<? super T1, ? super T2, ? extends R> combiner) {
        ObjectHelper.requireNonNull(source1, "source1 is null");
        ObjectHelper.requireNonNull(source2, "source2 is null");
        return combineLatest(Functions.toFunction(combiner), bufferSize(), source1, source2);
    }
package com.yudong80.reactivejava.chapter04.combine;

import io.reactivex.Observable;
import io.reactivex.ObservableEmitter;
import io.reactivex.observables.ConnectableObservable;

import java.util.Scanner;

public class ReactiveSum2 {

    public static void main(String[] args) {
        new ReactiveSum2().run();
    }

    private void run() {

        ConnectableObservable<String> source = userInput();

        Observable<Integer> a = source
                .filter(str -> str.startsWith("a:"))
                .map(str -> str.replace("a:", ""))
                .map(Integer::parseInt);

        Observable<Integer> b = source
                .filter(str -> str.startsWith("b:"))
                .map(str -> str.replace("b:", ""))
                .map(Integer::parseInt);

        Observable.combineLatest(
                a.startWith(0),
                b.startWith(0),
                (x, y) -> x + y)
                .subscribe(res -> System.out.println("Result : " + res));

        source.connect();
    }

    private ConnectableObservable<String> userInput() {
        return Observable.create((ObservableEmitter<String> emitter) -> {
            Scanner sc = new Scanner(System.in);
            while (true){
                System.out.println("Input : ");
                String line = sc.nextLine();
                emitter.onNext(line);

                if(line.indexOf("exit") >= 0){
                    sc.close();
                    break;
                }
            }
        }).publish();
    }

}
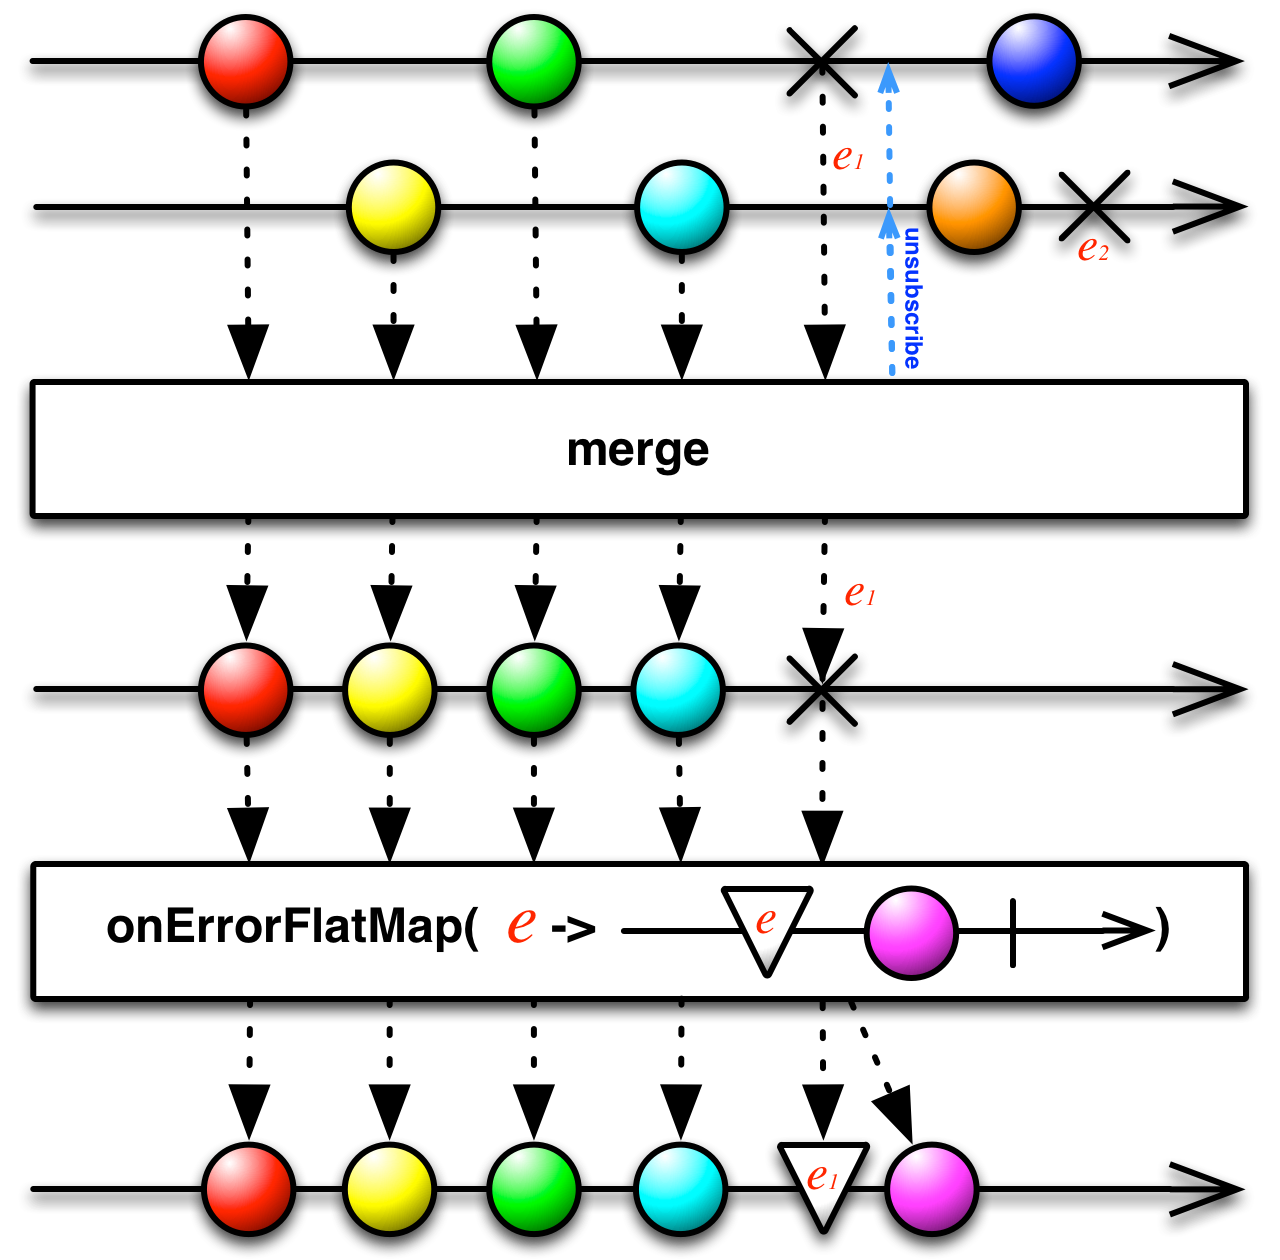
Merge() 함수
zip함수나 combineLatest함수와 비교하면 가장 단순한 결합 함수이다. 입력 Observable의 순서와 모든 Observable이 데이터를 발행하는지 등에 관여하지 않고 어느 것이든 업스트림에서 먼저 입력되는 데이터를 그대로 발행합니다.
@Override
public void marbleDiagram() {
	String[] data1 = {RED, GREEN}; //1, 3
	String[] data2 = {YELLOW, SKY, PUPPLE}; //2, 4, 6

	Observable<String> source1 = Observable.interval(0L, 100L, TimeUnit.MILLISECONDS)
			.map(Long::intValue)
			.map(idx -> data1[idx])
			.take(data1.length);
	Observable<String> source2 = Observable.interval(50L, TimeUnit.MILLISECONDS)
			.map(Long::intValue)
			.map(idx -> data2[idx])
			.take(data2.length);

	Observable<String> source = Observable.merge(source1, source2);
	source.subscribe(Log::i);
	CommonUtils.sleep(1000);
	CommonUtils.exampleComplete();
}
//원형
@SuppressWarnings({ "unchecked", "rawtypes" })
  @CheckReturnValue
  @SchedulerSupport(SchedulerSupport.NONE)
  public static <T> Observable<T> merge(ObservableSource<? extends T> source1, ObservableSource<? extends T> source2) {
      ObjectHelper.requireNonNull(source1, "source1 is null");
      ObjectHelper.requireNonNull(source2, "source2 is null");
      return fromArray(source1, source2).flatMap((Function)Functions.identity(), false, 2);
  }
concat() 함수
2개 이상의 Observable을 이어 붙여주는 함수이다. 첫 번째 Observable에 onComplete이벤트가 발생해야 두번 째 Observable을 구독합니다. 스레드를 활용한 일반적인 코드로 이와 같은 내용을 구현하기 어려움.
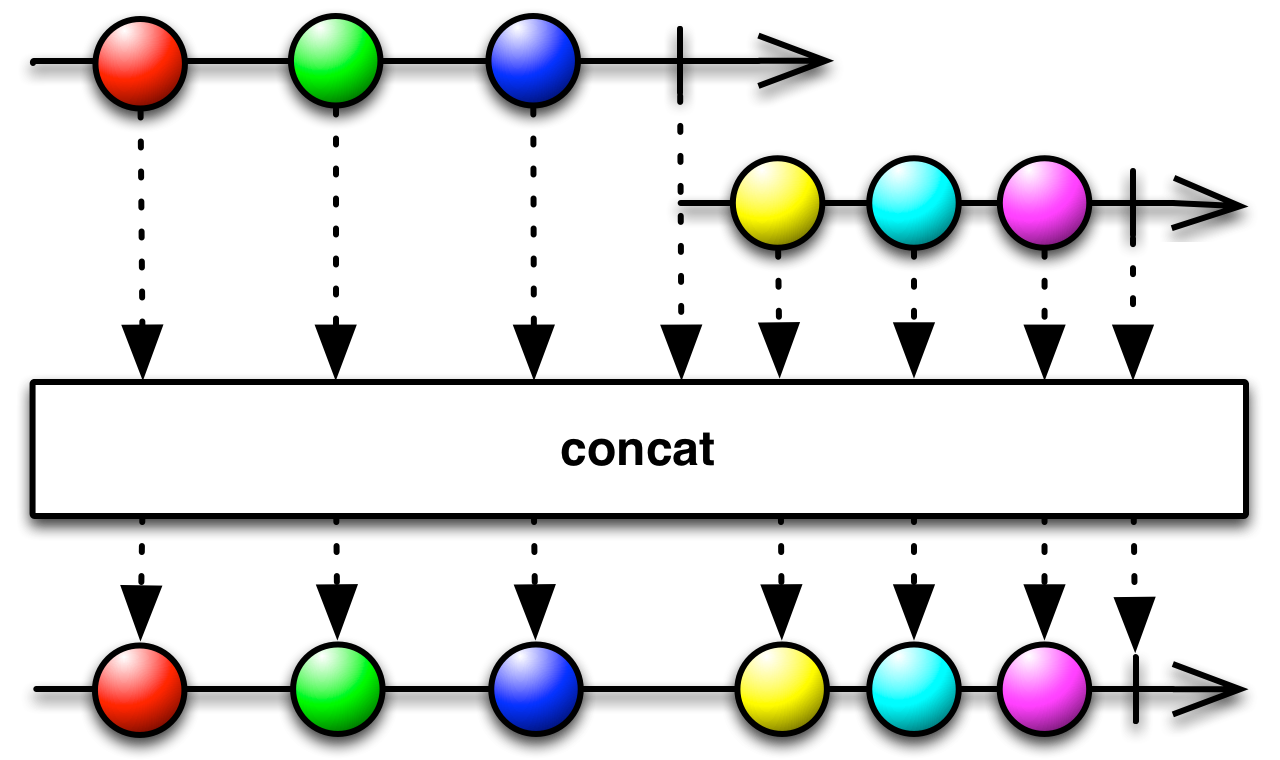
첫 번째 Observable에 onComplete 이벤트가 발생하지 않게 하면 두 번쨰 Observable은 영원히 대기합니다. 이는 잠재적인 메모리 누수의 위험을 내포. 따라서 입력 Observable이 반드시 완료(onComplete 이벤트)될 수 있게 해야합니다.
 public void marbleDiagram() {
		Action onCompleteAction = () -> Log.d("onComplete()");

		String[] data1 = {"RED", "GREEN", "BLUE"};
		String[] data2 = {"YELLOW", "SKY", "PUPPLE"};
		Observable<String> source1 = Observable.fromArray(data1)
				.doOnComplete(onCompleteAction);
		Observable<String> source2 = Observable.interval(100L, TimeUnit.MILLISECONDS)
				.map(Long::intValue)
				.map(idx -> data2[idx])
				.take(data2.length)
				.doOnComplete(onCompleteAction);

		Observable<String> source = Observable.concat(source1, source2)
				.doOnComplete(onCompleteAction);
		source.subscribe(Log::i);
		CommonUtils.sleep(1000);
		CommonUtils.exampleComplete();
	}
concat()함수에서 결합할 수 있는 Observable의 갯수는 최대 4개입니다.
4.조건연산자
조건 연산자는 Observable의 흐름을 제어하는 역할을 수행합니다. 필터 연산자가 발생된 값을 채택하느냐 기각하느냐 여부에 초점을 맞춘다면, 조건 연산자는 지금까지의 흐름을 어떻게 제어(Conditioning)할 것인지에 초점을 맞춥니다.
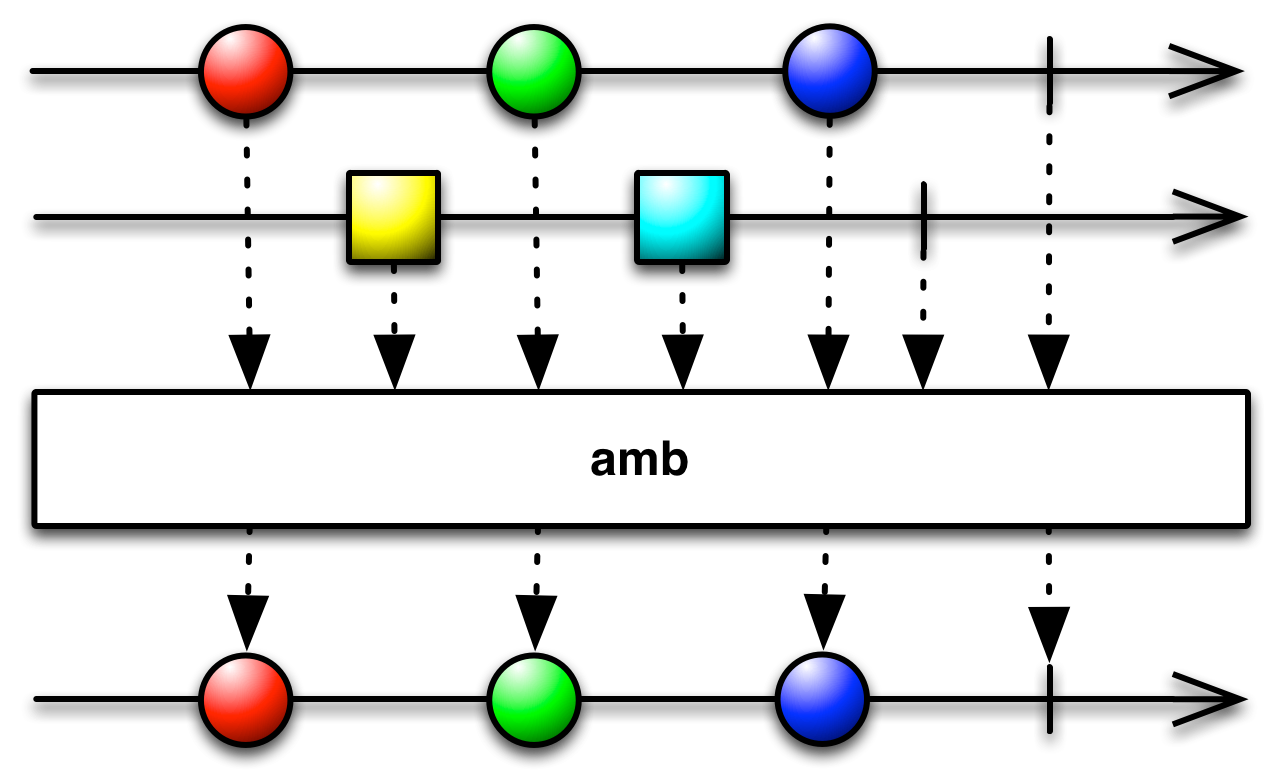
amb() 함수
둘 중 어느 것이든 먼저 나오는 Observable 을 채택합니다.
public void marbleDiagram() {
		String[] data1 = {RED, GREEN, BLUE};
		String[] data2 = {rectangle(YELLOW), rectangle(SKY)};

		List<Observable<String>> sources = Arrays.asList(
				Observable.fromArray(data1)
						  .doOnComplete(() -> Log.d("Observable #1 : onComplete()")),
				Observable.fromArray(data2)
						  .delay(100L, TimeUnit.MILLISECONDS)
						  .doOnComplete(() -> Log.d("Observable #2 : onComplete()")));

		Observable.amb(sources)
				  .doOnComplete(() -> Log.d("Result : onComplete()"))
				  .subscribe(Log::i);
		CommonUtils.sleep(1000);
		CommonUtils.exampleComplete();
	}

  결과는
main | value = 1
main | value = 3
main | value = 5
main | debug = Observable #1 : onComplete()
main | debug = Result : onComplete()

-----------------------
takeUntil(other) 함수
other Observable에서 데이터가 발행되기 전까지만 현재 Observable을 채택합니다.
takeUntil은 take()함수에 조건을 설정할 수 있다. 구체적으로 살펴보면 인자로 받은 Observable에서 어떤 값을 발행하면 현재 Observable의 데이터 발행을 중단하고 즉시 완료(onComplete)합니다.
즉, take()함수처럼 일정 개수만 값을 발행하되 완료 기준을 다른 Observable에서 값을 발행하는지로 판단하는 것입니다.
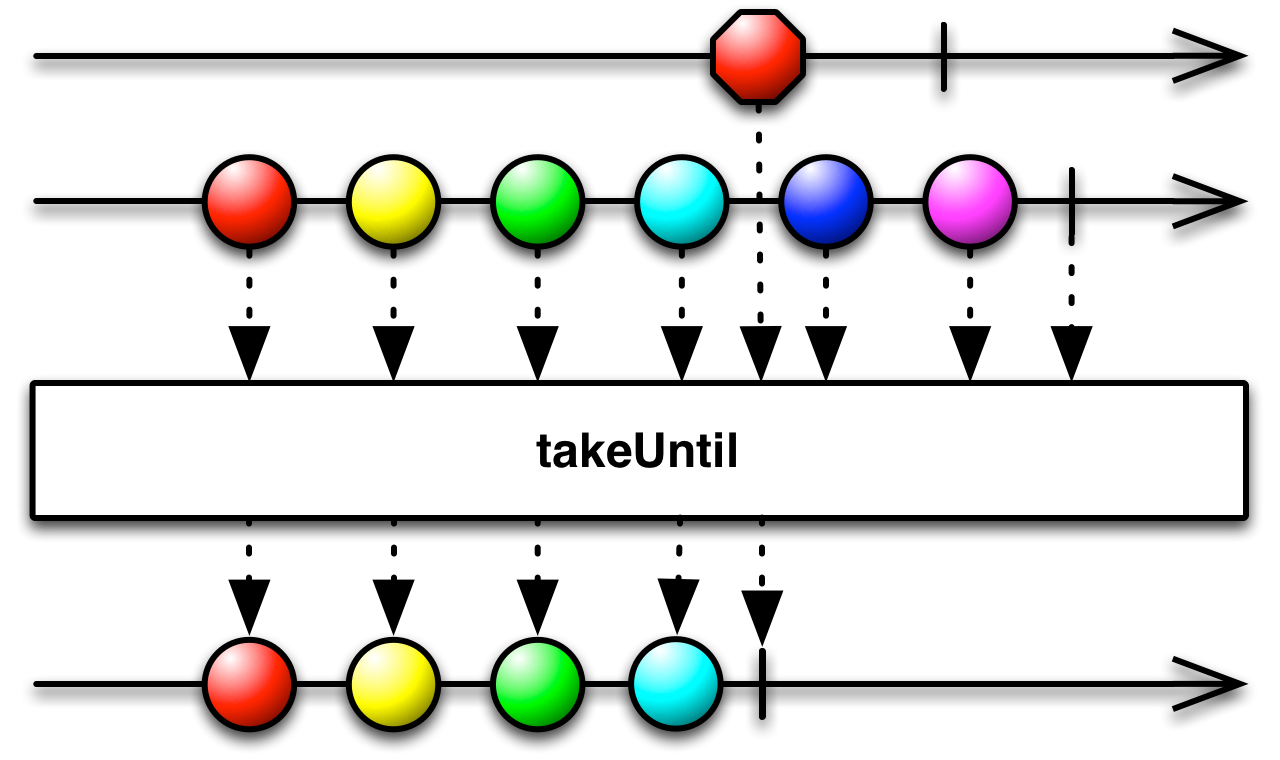
public void marbleDiagram() {
		String[] data = {RED, YELLOW, GREEN, SKY, BLUE, PUPPLE};

		Observable<String> source = Observable.fromArray(data)
				.zipWith(Observable.interval(100L, TimeUnit.MILLISECONDS),
						(val, notUsed) -> val)
				.takeUntil(Observable.timer(500L, TimeUnit.MILLISECONDS));

//red가 500L뒤에 발행되면서 정지된다.

		source.subscribe(Log::i);
		CommonUtils.sleep(1000);
		CommonUtils.exampleComplete();
	}

// 원형
@CheckReturnValue
@SchedulerSupport(SchedulerSupport.NONE)
public final <U> Observable<T> takeUntil(ObservableSource<U> other) {
    ObjectHelper.requireNonNull(other, "other is null");
    return RxJavaPlugins.onAssembly(new ObservableTakeUntil<T, U>(this, other));
}
skipUntil(other) 함수
takeUntil(other)함수와는 반대로 other Observable에서 데이터가 발행될 때까지 동안 현재 Observable에서 발행하는 값을 무시합니다.
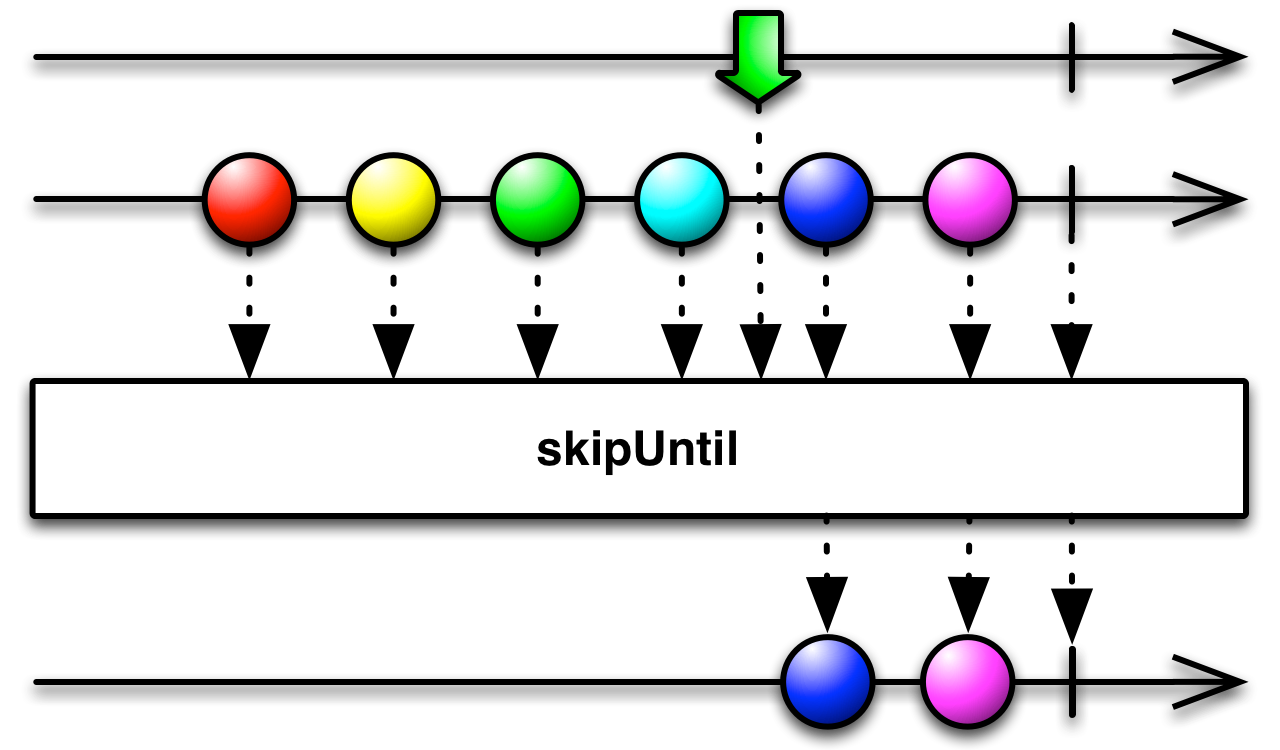
takeUntil 함수와는 다르게 other Observable에서 화살표가 나올 때까지는 값을 발행하지 않고 건너뛰다가 other Observable에서 값을 발행하는 순간부터 원래 Observable에서 값을 정상적으로 발행하기 시작합니다.
@Override
	public void marbleDiagram() {
		String[] data = {RED, YELLOW, GREEN, SKY, BLUE, PUPPLE};

		Observable<String> source = Observable.fromArray(data)
				.zipWith(Observable.interval(100L, TimeUnit.MILLISECONDS),
						(val, notUsed) -> val)
				.skipUntil(Observable.timer(500L, TimeUnit.MILLISECONDS));

		source.subscribe(Log::i);
		CommonUtils.sleep(1000);
		CommonUtils.exampleComplete();
	}


결과
RxComputationThreadPool-2 | value = 5
RxComputationThreadPool-2 | value = 6
all() 함수
Observable에 입력되는 값이 모두 특정 조건에 맞을 때만 true값을 발행. 만약 조건이 마지 않으면 바로 false합니다.
다시, 주어진 조건에 100% 맞을 때만 true 값을 발행하고 조건에 맞지 않는 데이터가 발행되면 바로 false값을 발행합니다.
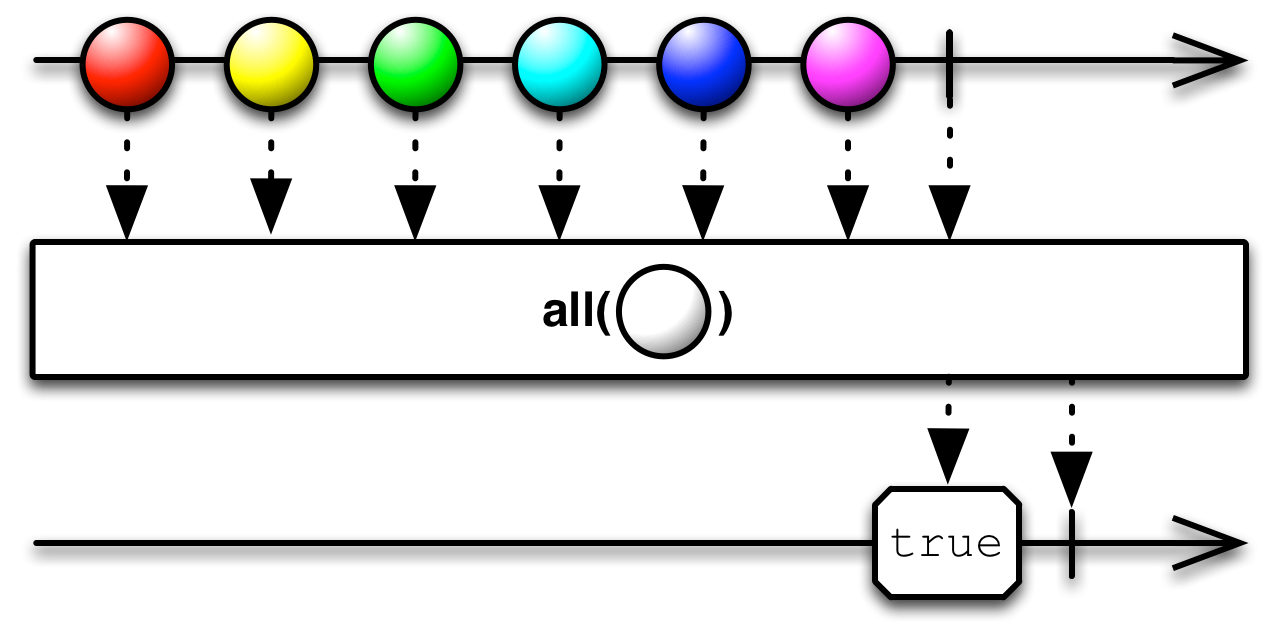
모든 모양이 ‘원’ 모양이어야만 true를 발행합니다.
@Override
	public void marbleDiagram() {
		String[] data = {RED, YELLOW, GREEN, SKY};

		Single<Boolean> source = Observable.fromArray(data)
			.map(Shape::getShape)
			.all(Shape.BALL::equals);
			//.all(val -> Shape.BALL.equals(Shape.getShape(val)));
		source.subscribe((Consumer<? super Boolean>) Log::i);
	}
5. 수학 및 기타 연산자
max(), sum()과 같은 수학 함수와 기타 분류에 해당하는 함수 살펴보기.
수학 함수
RxJava2에는 RxJava2Extensions 라이브러리를 활용하여 간단한 수학 함수 및 집합 함수의 활용법을 살펴봅니다.
compile "com.github.akarnokd:rxjava2-extensions:0.17.5"
gradle에 추가.
예제 추가
public void marbleDiagram() {
		Integer[] data = {1, 2, 3, 4};

		//1. count
		Single<Long> source = Observable.fromArray(data)
				.count();
		source.subscribe(count -> Log.i("count is " + count));

		//2. max() & min()
		Flowable.fromArray(data)
			.to(MathFlowable::max)
			.subscribe(max -> Log.i("max is " + max));

		Flowable.fromArray(data)
			.to(MathFlowable::min)
			.subscribe(min -> Log.i("min is " + min));

		//3. sum() & average
		Flowable<Integer> flowable = Flowable.fromArray(data)
				.to(MathFlowable::sumInt);
		flowable.subscribe(sum -> Log.i("sum is " + sum));

		Flowable<Double> flowable2 = Observable.fromArray(data)
				.toFlowable(BackpressureStrategy.BUFFER)
				.to(MathFlowable::averageDouble);
		flowable2.subscribe(avg -> Log.i("average is " + avg));
	}

main | value = count is 4
main | value = max is 4
main | value = min is 1
main | value = sum is 10
main | value = average is 2.5
delay() 함수
RxJava에서는 시간을 다루는 함수들이 많은데,
주기적으로 Observable애서 값을 발행해주는 interval()
일정 시간이 지난 후 값을 발행해주는 timer()
Callable을 등록해두고 실행을 지연하는 defer()
앞으로 7장에서 배울 Buffer(), debounce(), sample(), window() 존재
delay함수는 단순하게 인자로 전달받는 time과 시간 단위(ms, m 등)만큼 입력받은 Observable의 데이터 발행을 지연시켜주는 역할
 @Override
 	public void marbleDiagram() {
 		CommonUtils.exampleStart();

 		String[] data = {RED, ORANGE, YELLOW, GREEN, SKY};
 		Observable<String> source = Observable.fromArray(data)
 				.delay(100L, TimeUnit.MILLISECONDS);
 		source.subscribe(Log::it);
 		CommonUtils.sleep(1000);
 		CommonUtils.exampleComplete();
 	}

 @CheckReturnValue
    @SchedulerSupport(SchedulerSupport.COMPUTATION)
    public final Observable<T> delay(long delay, TimeUnit unit) {
        return delay(delay, unit, Schedulers.computation(), false);
    }
100ms 만큼 밀려서 발행된다.
#### timeInterval() 함수 어떤 값을 발행했을 때 이전 값을 발행한 이후 얼마나 시간이 흘렀는지를 알려줍니다.
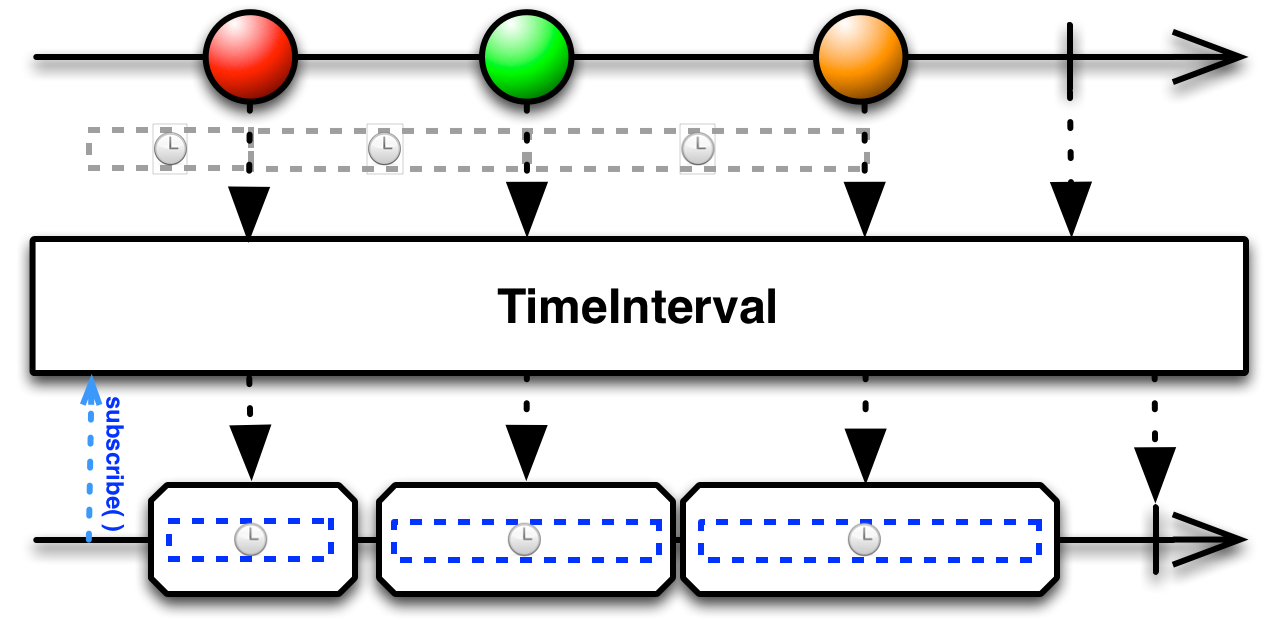
public void marbleDiagram() {
		String[] data = {"RED", "GREEN", "ORANGE"};

		CommonUtils.exampleStart();
		Observable<Timed<String>> source = Observable.fromArray(data)
			.delay(item -> {
				CommonUtils.doSomething();
				return Observable.just(item);
			})
			.timeInterval();

		source.subscribe(Log::it);
		CommonUtils.sleep(1000);
	}

@CheckReturnValue
    @SchedulerSupport(SchedulerSupport.NONE)
    public final Observable<Timed<T>> timeInterval() {
        return timeInterval(TimeUnit.MILLISECONDS, Schedulers.computation());
    }

main | 430 | value = Timed[time=59, unit=MILLISECONDS, value=RED]
main | 510 | value = Timed[time=81, unit=MILLISECONDS, value=GREEN]
main | 609 | value = Timed[time=99, unit=MILLISECONDS, value=ORANGE]