Composite 패턴
컴포지트의 의미는 일부 또는 그룹을 표현하는 객체들을 트리 구조로 구성하여 관계를 표현한다는 의미이다.
보통 트리구조를 다룰 때 프로그래머는 리프노드와 브랜치를 구분해야 한다. 이 부분은 복잡성을 높이기 때문에 많은 에러를 촉발하는데, 이를 해결하기 위해 복잡하고 원시적인 객체를 동일하게 취급하기 위한 인터페이스를 작성할 수 있다.
이 인터페이스와 composite 클래스를 통해 Client에서는 전체와 부분을 구분하지 않고 동일한 인터페이스로 leaf노드들의 간단한 제어가 가능하다.
예1)
이는 한눈에 알아볼 수 있는 코드라서 JS로 바꾸지 않았다.
/**
Node 클래스는 기본적인 파일 및 디렉토리의 근간이라고 가정합니다.
모든 파일과 디렉토리는 이름을 가지고 있을테니 이름을 반환할 getName() 메소드를 가집니다.
*/
interface Node {
    public String getName();
}

/**
File 클래스는 Node 인터페이스를 구현하면 끝입니다. 자신은 자식 요소를 가질 필요가 없기 때문이죠.
*/
class File implements Node {
    private String name;
    // ...
    @Override
    public String getName(){ return name; }
}

/**
Directory 클래스는 Node 인터페이스를 구현하는 것 외에도 자식 요소를 담아둘 List가 필요합니다.
*/
class Directory implements Node {
    private String name;
    private List<Node> children;
    // ...
    @Override
    public String getName(){ return name; }
    public void add(Node node) {
        children.add(node);
    }
}
Directory dir = new Directory();
dir.add(new File()); // 디렉토리에 파일 하나를 삽입!
dir.add(new Directory()); // 디렉토리에 디렉토리를 삽입!
Directory secondDir = new Directory();
secondDir.add(dir); // 기존 루트 디렉토리를 새로 만든 디렉토리에 삽입!
위 코드는 간단한 트리 구조 계층 관계를 표현하는 파일 시스템을 나타낸다.
Node라는 인터페이스를 통해 Directory에서 File과 Directory 둘다 제어할 수 있게, 즉 처리 방법의 차이가 없이 같은 방법으로 취급할 수 있게 구성한 코드이다.

UML 다이어그램을 해석해보면
"Client" 클래스는 "Leaf" 와 "Composite" 클래스를 직접 참조하지 않고, 공통 인터페이스 "Component" 를 참조하는 것을 볼 수 있다.

"Leaf" 클래스는 "Component" 인터페이스를 구현한다.

"Composite" 클래스는 "Component" 객체 자식들을 유지하고, operation() 과 같은 요청을 통해 자식들에게 전달한다.


각각을 조금 더 코드 관점에서 보면 다음과 같다.


Component

모든 component 들을 위한 추상화된 개념으로써, "Leaf" 와 "Composite" 클래스의 인터페이스이다.


Leaf

"Component" 인터페이스를 구현하고, 구체 클래스를 나타낸다.


Composite

"Component"  인터페이스를 구현하고, 구현되는 자식(Leaf or Composite) 들을 가지고, 이러한 자식들을 관리하기 위한 메소드(addChild, removeChild...)를 구현한다.

또한, 일반적으로 인터페이스에 작성된 메소드는 자식에게 위임하는 처리를 한다.
그리고 현재 위의 코드에 적용해본다면 위의 Node 인터페이스가 Component의 역할
위의 File은 Leaf 의 역할
위의 Directory는 Composite의 역할을 한다.
예2)

public class Keyboard {
  private int price;
  private int power;
  public Keyboard(int power, int price) {
    this.power = power;
    this.price = price;
  }
  public int getPrice() { return price; }
  public int getPower() { return power; }
}
public class Body { 동일한 구조 }
public class Monitor { 동일한 구조 }


public class Computer {
  private Keyboard Keyboard;
  private Body body;
  private Monitor monitor;

  public addKeyboard(Keyboard keyboard) { this.keyboard = keyboard; }
  public addBody(Body body) { this.body = body; }
  public addMonitor(Monitor monitor) { this.monitor = monitor; }

  public int getPrice() {
    int keyboardPrice = keyboard.getPrice();
    int bodyPrice = body.getPrice();
    int monitorPrice = monitor.getPrice();
    return keyboardPrice + bodyPrice + monitorPrice;
  }
  public int getPower() {
    int keyboardPower = keyboard.getPower();
    int bodyPower = body.getPower();
    int monitorPower = monitor.getPower();
    return keyboardPower + bodyPower + monitorPower;
  }
}


public class Client {
  public static void main(String[] args) {
    // 컴퓨터의 부품으로 Keyboard, Body, Monitor 객체를 생성
    Keyboard keyboard = new Keyboard(5, 2);
    Body body = new Body(100, 70);
    Monitor monitor = new Monitor(20, 30);

    // Computer 객체를 생성하고 부품 객체들을 설정
    Computer computer = new Computer();
    computer.addKeyboard(keyboard);
    computer.addBody(body);
    computer.addMonitor(monitor);

    // 컴퓨터의 가격과 전력 소비량을 구함
    int computerPrice = computer.getPrice();
    int computerPower = computer.getPower();
    System.out.println("Computer Price: " + computerPrice + "만원");
    System.out.println("Computer Power: " + computerPower + "W");
  }
}

[출력 결과]
Computer Price: 102만원
Computer Power: 120W
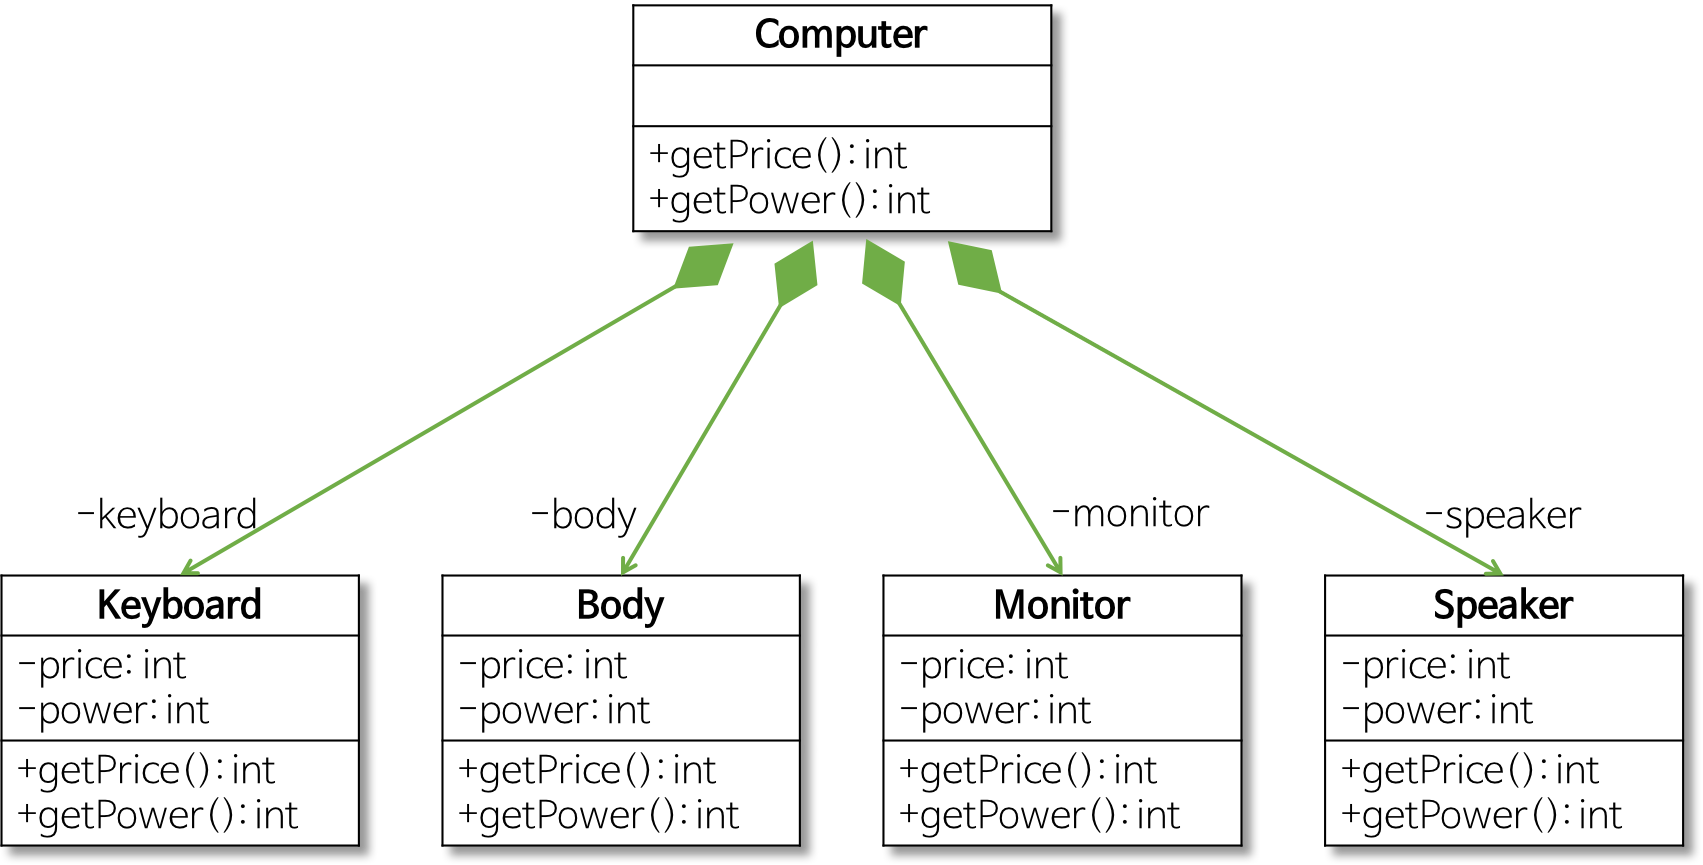
첫번째 다이어그램에서 두번째 다이어 그램으로 가기 위해서는 아래와 같은 과정이 필요하다.
- 새로운 클래스 생성
- 이를 처리하는 computer class에 새로운 클래스가 적용되어야할 변수, 메서드 등에 대한 추가
간단하게 두가지를 썼지만 Computer 클래스에서는 추가된 클래스에 대한 변수선언, 해당하는 메서드, getPrice에 대해 해당 클래스의 가격 명시 등.. 여러가지 추가 사항이 많아진다.
위와 같은 방식의 설계는 확장성이 좋지 않다. 즉 OCP를 만족하지 않는다. 여기서 OCP는 확장에는 열려있지만, 수정에는 닫혀있어야 하는 원칙으로 새로운 부품이 늘어남에 따라 원래의 Class 내부를 수정해야 하고 이 수정이 구체적인 객체를 가리키기 때문에 위반한다는 의미이다.
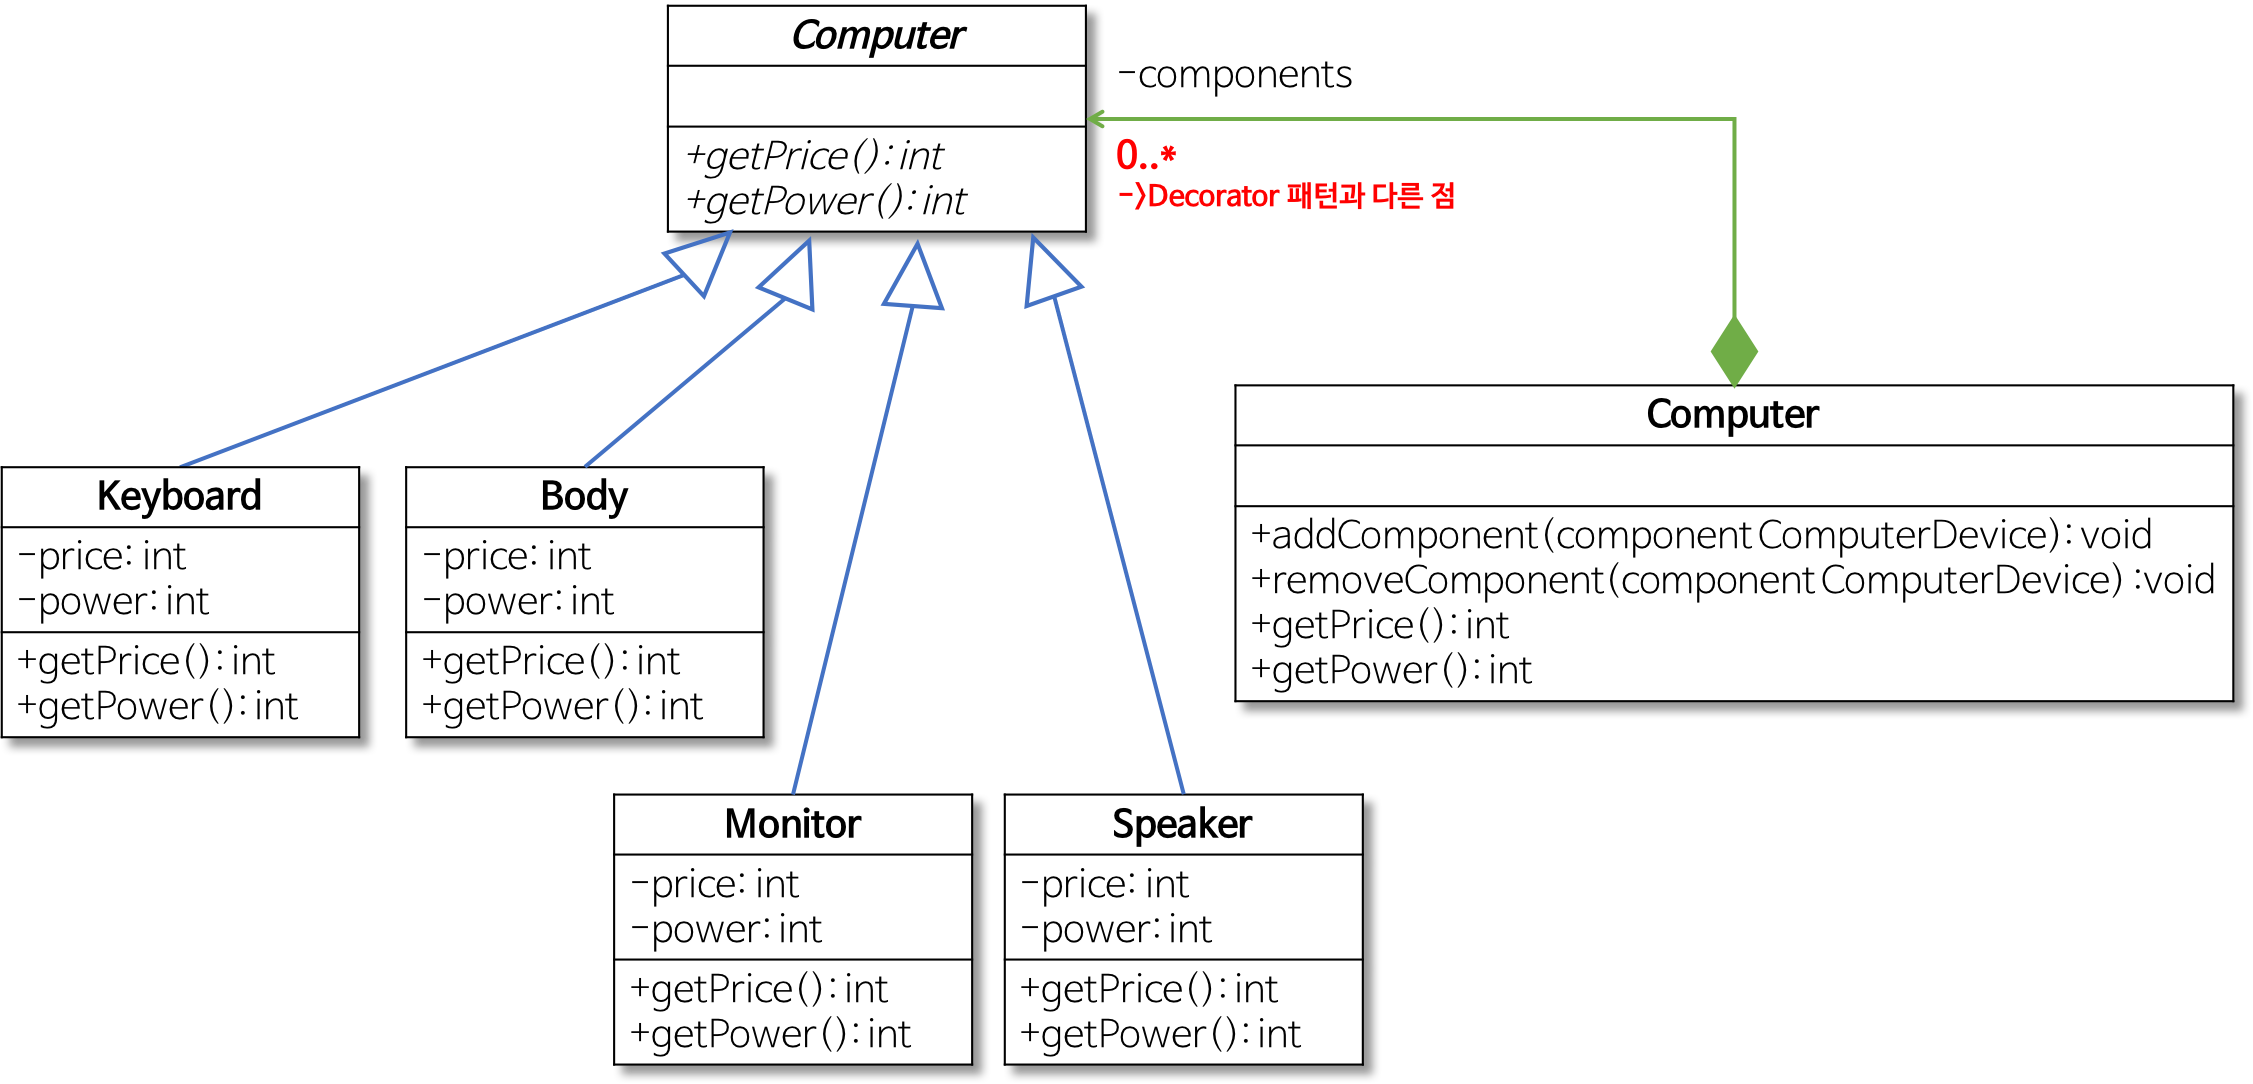
이를 해결하기 위해서는 위의 File, Directory 코드 처럼 Node라는 공통 인터페이스를 만들고 이를 처리하는 Composite 클래스를 지정하여 패턴을 적용하는 것으로 해결할 수 있다.
public abstract class ComputerDevice {
  public abstract int getPrice();
  public abstract int getPower();
}

public class Keyboard extends ComputerDevice {
  private int price;
  private int power;
  public Keyboard(int power, int price) {
    this.power = power;
    this.price = price;
  }
  public int getPrice() { return price; }
  public int getPower() { return power; }
}
public class Body { 동일한 구조 }
public class Monitor { 동일한 구조 }

public class Computer extends ComputerDevice {
  // 복수 개의 ComputerDevice 객체를 가리킴
  private List<ComputerDevice> components = new ArrayList<ComputerDevice>();

  // ComputerDevice 객체를 Computer 클래스에 추가
  public addComponent(ComputerDevice component) { components.add(component); }
  // ComputerDevice 객체를 Computer 클래스에서 제거
  public removeComponent(ComputerDevice component) { components.remove(component); }

  // 전체 가격을 포함하는 각 부품의 가격을 합산
  public int getPrice() {
    int price = 0;
    for(ComputerDevice component : components) {
      price += component.getPrice();
    }
    return price;
  }
  // 전체 소비 전력량을 포함하는 각 부품의 소비 전력량을 합산
  public int getPower() {
    int power = 0;
    for(ComputerDevice component : components) {
      price += component.getPower();
    }
    return power;
  }
}

public class Client {
  public static void main(String[] args) {
    // 컴퓨터의 부품으로 Keyboard, Body, Monitor 객체를 생성
    Keyboard keyboard = new Keyboard(5, 2);
    Body body = new Body(100, 70);
    Monitor monitor = new Monitor(20, 30);

    // Computer 객체를 생성하고 addComponent()를 통해 부품 객체들을 설정
    Computer computer = new Computer();
    computer.addComponent(keyboard);
    computer.addComponent(body);
    computer.addComponent(monitor);

    // 컴퓨터의 가격과 전력 소비량을 구함
    int computerPrice = computer.getPrice();
    int computerPower = computer.getPower();
    System.out.println("Computer Price: " + computerPrice + "만원");
    System.out.println("Computer Power: " + computerPower + "W");
  }
}
-
Computer 클래스
- ComputerDevice의 하위 클래스면서 복수개의 ComputerDevice를 갖도록 설계했다(배열을 통해서)
- addComponent() 메서드를 통해 구체적인 부품을 Computer클래스의 부품으로 설정했다.(배열에 들어가도록)
-
Client
- addComponent()메서드를 통해 부품 종류에 관계 없이 동일한 메서드로 부품의 추가가 가능하다.
-
이를 통해 Computer 클래스는 OCP를 준수한다.
-
새 부품의 추가는 ComputerDevice 클래스의 하위 클래스로 구현하면 된다.
참조: https://blog.naver.com/PostView.nhn?blogId=mycho&logNo=221853446669&categoryNo=0&parentCategoryNo=0&viewDate=¤tPage=1&postListTopCurrentPage=1&from=postList&userTopListOpen=true&userTopListCount=30&userTopListManageOpen=false&userTopListCurrentPage=1 https://gmlwjd9405.github.io/2018/08/10/composite-pattern.html https://jdm.kr/blog/228 https://mygumi.tistory.com/343
-